Keyboard Builders' Digest / Advent Calendar
Falling Down The Rabbit Hole
Ben Vallack shares his free-fall into the custom keyboard rabbit hole where things keep getting weirder and weirder.

Published December 1, 2022
Introduction
I’m a software developer (co-owner of SetSeed CMS) and workflow nerd and I’m slightly obsessed with optimising keyboards. I also have a YouTube channel that looks at day to day workflow hacks and I’ve covered this keyboard journey extensively over the last few years.
---
What a few years I've had. I started a YouTube channel a few years ago and stumbled into making videos on keyboards as I've always been fascinated by the way we interact with computers.
Initially, with each step on my journey, I felt like I had discovered the end game. Eventually I cottoned on and realised this was absolute nonsense. I now realise there is no end game. Simply, a very deep rabbit hole where things get weirder and more bizarre the further you go down.
What follows is a short recap over my keyboard journey with links to videos, config files and other useful bits and bobs scattered throughout.
Planck EZ
Let's start with the Planck EZ. I remember the feeling I had when I first tried this. It felt so amazing to have something so radically different to the Apple Magic Keyboard that I was used to. I felt like I'd become part of a new world of elite computer users who could just look back in disbelief at the rest of the world with their vast keyboards and contorted modifier combinations.
I couldn't wait to do a video on it and because it was a fairly niche product it really helped my channel get some traction. In fact I was so excited I did 5 videos, one as an introduction to mechanical keyboards, one looking at ortholiner vs staggered, then 40% vs 60% and then a full review followed by a video looking at how well the Planck EZ worked with an iPad.
This wasn't actually my first mechanical keyboard - before that I had been using the Anne Pro 2 but it wasn't long before I was drawn to ortholinear. The Anne Pro 2 was a gateway. It's actually interesting how large the community of users is who use these qwerty staggered 60% boards. They seem to be more interested in the keycaps and themed desk mats than the real utility in the boards. If only they knew how much fun there is to be had when you take it further!
Moonlander
After the Planck EZ came the Moonlander; ZSA sent me the Moonlander in exchange for some videos which again further helped my channel get some momentum.
In some sense the Moonlander was a bit of a curveball to my main goals which was to have a portable keyboard that let me use desktop grade productivity even with an iPad. The Planck EZ was actually working pretty well with that idea in mind.
When we introduced the larger size and inherently less portable nature of the split with the larger Moonlander I was back to thinking in terms of the Moonlander for desktop and the Planck for on-the-go with the iPad.
This in itself isn't a bad idea but I was forced to confront the idea of redundancy in the keyboard. If I was to use the same layout on both keyboards I'd be leaving plenty of keys unused on the Moonlander.
The great thing about the Moonlander and Planck is they are great to do YouTube videos on because their RGB backlighting effects look stunning on camera.
The 36 key experiments
As I started removing keys with the initial intention of creating a common layout on both boards I started to see the appeal in a 36 key layout. The idea being that all keys would be within one key's movement from home positions, including the thumbs. I mapped this layout to both boards and did videos looking at how it worked in either case. Essentially a 5x3 grid with three thumb keys each side.
There were a range of tricks and approaches I tried as I refined the approach to create a fast and comfortable 36 key layout. I experimented with a fully one-shot based layer system that meant I could use the layers without holding down keys. I thought if I could roll through to a layer it would result in less fatigue than holding down layer switches.
I also experimented with home row mods at this stage but failed to come up with a configuration that avoided conflicts between normal typing rolls and triggering a layer switch. Something that I still don't think is possible on the Shift key to this day. I have managed to make them work with layers and the other mods but Shift is still on a dedicated thumb key.
ZSA introduced tap dance keys around this time too which allowed for some interesting things to be done. I really embraced this by making the hold function of each alpha key to the CMD version of that key. I really enjoyed this layout and it gave me a taste for the idea of minimising finger movement itself as being a goal with ergonomics.
The dedicated 36 key boards
My enthusiasm for the 36 key layout led me to search for dedicated boards that used this arrangement. I of course found the ill fated Gergoplex and then the 5 column Corne.
The Gergoplex was created by someone who seemed to have some health issues that has lead to delays in orders and subsequently the website being switched off as well but it was a stunning keyboard in terms of aesthetics and layout.
My experience with the Corne was a 5 column MX switched version with full RGB backlight and under-glow in a 3D printed case. A great build and again great to make a video on with the RGB effects.
But it was the Gergoplex that really opened my eyes to the delights of low profile switches and that shaped the future direction I'd be falling down the rabbit hole.
The layout experiments
At some point in all this I decided to see if I could improve on the Qwerty typing experience. Until this point I'd just felt the idea of trying to relearn the letter positions was just going to be too hard and time consuming.
But my desire to keep improving the efficiency and comfort of my typing led me to jump in.
I first tried the Workman layout and actually got pretty fast with it. At first it felt great and I could really see the benefit over Qwerty. However as I got faster I started to feel that some of the bigrams and rolls were feeling very awkward – around the left ring finger. My hand would feel strange and unpleasant as it tried to fire the keys.
So I looked into this and realised there was a characteristic of the Workman layout that had been downplayed by the creator that I think was contributing to what I was experiencing. This was essentially the SFU or same finger utilisation. This is where the same finger is used to fire consecutive keys and it's a very horrible feeling. It kind of feels like taking a step with only one leg – you can see how much easier it is alternating between legs.
I went in search of a layout that had an improved SFU score and found Colemak DH. This sounded great and its increased focus on rolling was something that appealed to me after experiencing the effect of poor SFU.
It immediately felt like a good move and I think having changed from Qwerty to Workman helped with this transition too.
Funnily enough though having experienced how much better Workman was than Qwerty and then how much better Colemak was than Workman, it got me wondering how much further it was possible to optimize the layout. It turns out like all areas of this crazy journey there are sub-communities who take these areas to extremes and there are many many other layouts out there all scoring differently in different areas.
Someone commented on a video suggesting I should try the ISRT layout which claimed to offer advantages over Colemak DH. I thought I'd try it for an hour and see how it felt to decide if it was worth learning. It immediately felt better again. So I jumped in and learned ISRT. And again the process of learning it felt easier than before which was a relief. It's worth clarifying that I don't wish to downplay how hard it is to learn a new layout – it is extremely hard and not something to undertake lightly, but at least I can say it does get easier the more you do it!
Getting ruthless with key removal
As I started to enjoy the effects of using super-efficient layouts I started to experiment with removing more keys. The goal being to further reduce overall finger movement and fatigue. I started with the Ferris sweep which was a 34 key layout having gone to two thumb keys per side.
I became obsessed with tweaking things and rapidly ended up testing 24 then 18 then 16 key layouts.
Of course at some stage on this journey I had to move some of the alpha keys to a second layer. This was a bit daunting and I questioned if I was taking things too far. But I gave it a go and I immediately felt the advantage of covering less distance with my fingers even if it meant more key presses overall.
Realising I was going to settle on something much less than 34 and having dabbled a bit in customising the Ferris Sweep design with KiCad I started exploring the process of designing my own board from scratch.
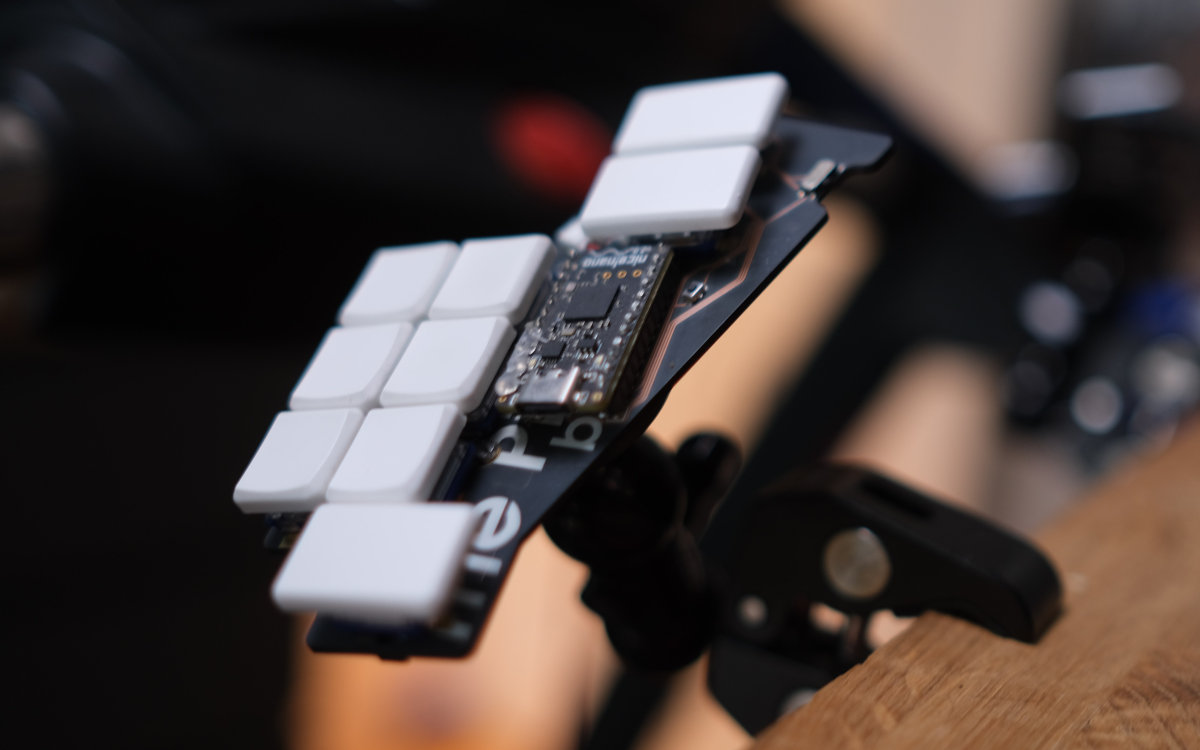
At my lowest point I went to 16 keys and realised that I could use two more keys on the thumbs to great effect. So I added them back and settled on the 18 key layout – but these keys weren't the same ones I had on the 18 key layout I'd used prior to the 16. Instead, I felt that the most useful roles for these two new secondary thumb keys would be a repeat key and a way of directly going into my second alpha layer but as capitals. This would eliminate a lot of the additional keypresses resulting from using two alpha key layers.
Discovering Ergogen
As I was iterating smaller layouts so frequently I was thrilled to find Ergogen, a tool to create scaffolding for KiCad for keyboard PCB designs. This wonderful tool makes it very easy to iterate over designs of keyboards with minimal time spent in the more fiddly and less iterable KiCad stage.
Essentially Ergogen allowed me to easily define key positions and then quickly tweak that and have an almost complete KiCad file ready to send to a PCB fabricator. This whole workflow made the process of experimenting with these kinds of keyboards extremely simple.
Moving to wireless
The community of Ergogen users tended to use nice!nano controllers with ZMK instead of the Elite-C with QMK controllers that I'd been using up to now, and this meant split keyboards could be totally wireless, with no connection between the halves or to the host.
This also means that some of the pins on the controller were no longer being used for the TRRS split connection. This is interesting as it means you can have a 36 key keyboard without using diodes to create a matrix. With a non-wireless board the limit was 34 keys. So the holy grail one-distance-from-home (1DFH) layout could now be achieved with super simple PCB design and much simpler soldering requirements.
Incidentally there was some discussion in the Ergogen discord about a better name for that 36 key layout (5x3+3) and the user S'mores suggested "Ergolocus" as a name for this layout which I thought was very cool! "Ergolocus+" could be used to represent 6x3+3 if you wanted the additional pinkie column.
Of course by this time I'd long moved on from such large layouts but I do enjoy the discussion around that size layout. I think it would be a resting point for a lot of people on this journey as it makes so much sense.
While we're in the topic of wireless builds it's also worth mentioning the branch of ZMK that can run in a dongle mode. This is where a third nice!nano is used with a USB connection to the host and then both halves of the board are treated as peripherals to the dongle. This is amazing in a desktop environment is it eliminates bluetooth connectivity issues as well as putting both haves of the keyboard into a low power mode. Consequently they last months at a time on the tiny 301228 batteries. This is how I use my permanently set up split board on my treadmill.
Looking forward
I've been using my 18 key layout for a while now and I don't think there are any major issues with it. The only thing I'm starting to realise is having a split keyboard is actually quite a hassle when it comes to being portable. I'm currently designing a unibody version of the same layout which should make it much easier to use with my iPad as a portable board that still shares exactly the same layout that I use on my desktop, which of course was the whole reason I started on this journey in the first place.
I'd encourage anyone who is interested in optimising their keyboard experience to follow a similar path – it has been a brilliant journey and jumping into the various enthusiast communities along the way has always been an enjoyable experience.
Resources
- My ZMK fork that includes various branches for dongle support, macros, tap dance, mouse emulation.
- My 18 key ZMK config based on the above auto-loaded ZMK.
- Ergogen: https://ergogen.xyz
- Moonlander layouts: 36 normal and 36 oneshot
- Planck EZ Layouts: 36 normal and 36 oneshot
| Ben Vallack (37)@BenVallack |
|---|---|
| Location | Wiltshire, England |
| Occupation | Co-Founder at SetSeed. YouTube Creator. |
| Niche | Tiny layouts, minimising finger movement |
| Fav. switch | Chocs |
| Fav. keycap profile | MBK |
| Other hobbies | JKD, Taekwondo, Circus-fit, Cars |
| Links | https://www.youtube.com/benvallack, https://www.setseed.com |
Published on Thu 1st Dec 2022. Featured in KBD #105.
Related

2022 Roundup: the year of EC
Cipulot sums up his journey in the field of designing electrostatic capacitive PCBs.
Designing Keycaps for Fun and Profit
A quick overview of Matt3o’s 10-years experience in the mechanical keyboard industry before delving into future projects including a collaboration with GMK.
The Handwiring Guy
Joe Scotto, the self-proclaimed “Handwiring Guy” sums up his last few months designing and building handwired keyboards.
One year of kbd.news
Tamas Dovenyi, the guy behind kbd.news, sums up one year of the blog touching on a wide range of topics from visitor stats to new features.