Keyboard Builders' Digest /
Forcy McForceFace
Jesse Vincent, cofounder of Keyboardio, describes building a force tester out of an old 3D printer: Forcy McForceFace.

Published December 10, 2023
Hi, I'm Jesse Vincent, one of the folks behind Keyboardio. We make the Model 100 and the Atreus and will soon be making the Bluetooth Keyboardio Preonic in partnership with OLKB. As part of our work, we sometimes need to go a little deeper into esoteric hardware than I ever could have imagined possible when we got into this business.
Force tester encounters
If you've been around mechanical keyboards for any length of time, you've probably run across a keyboard force diagram – it's that little chart that shows how much force it takes to press a given type of switch over the course of a keystroke.
The first time I saw a machine that measured keyswitch force curves, it was at Kailh's factory in Dongguan, China. It was a fancy, automatic custom machine that could press a switch and output a CSV file of force and position data.
The second time I saw a force tester, it was at a keyboard factory and was, for all intents and purposes, a stand, a handle, a gear, and an old-school analog force meter with a dial. (Think of it like an upside-down luggage scale that measures press instead of pull.) The engineer would crank the handle a little bit, which moved the force tester 0.1mm closer to the switch. They'd read the measurement off the force meter's dial and scribble it down on a sheet of paper. Later, someone would transcribe everything into Excel and they'd make a chart.
The issue
At Keyboardio, we had a problem—we were feeling pressure levels on switches that didn't come anywhere close to matching what the switch manufacturer had documented in their datasheets.
We needed some way to document and characterize the problem. And we were 100% willing to spend dozens of hours to build an automated tool, rather than having to take every reading by hand.
The plan
We didn't have the tens of thousands of dollars to buy a commercial force-testing apparatus. What we did have were a crappy old 3D printer that a friend had pawned off on us after it stopped printing, an Arduino, a Chinese knock-off of a fancy Japanese force testing probe with an undocumented serial protocol, and a desire to waste time reverse engineering things.
What we needed was a way to hold a force tester in a rigid, well defined position above a keyswitch and then slowly, in tiny increments, move it downward, taking force readings at every step.
Implementation
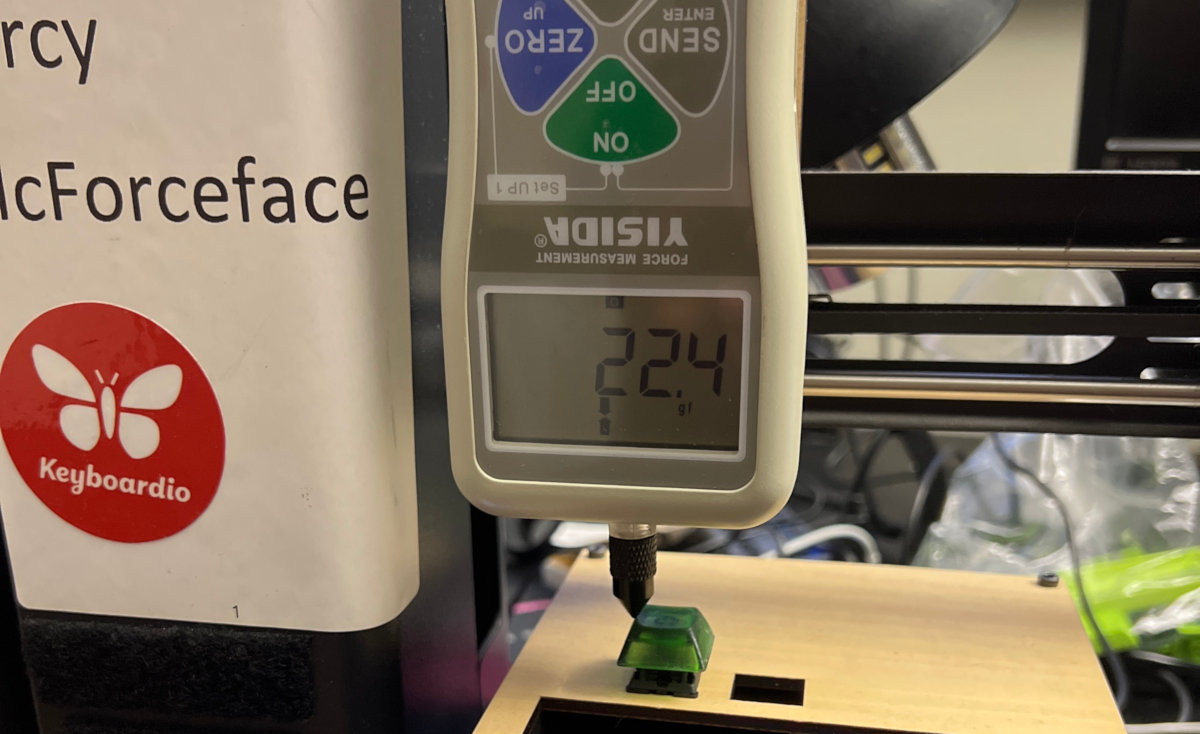
The 3D Printer, a Monoprice Mini, seemed like a great starting point for an automated gantry for our test setup. We disconnected the bed heater that would have melted keyswitches while testing them. We yanked off the hot end that's usually used to spew molten plastic as the whole "printing" part of 3D printing. We made a tiny little bracket to attach our Yisida brand force gauge to the hotend's mount point on the gantry. And then we got ready to detach the z-axis (vertical) motor from the 3D printer's control circuitry, so that we could control it with the aforementioned Arduino. Thankfully, before we did, we realized that we didn't need to build our own motor controller. That 3D printer – we could talk to it! All we had to do was to connect to the 3D printer with a serial connection and say "G1 Z0.01" to move the gantry up 0.01 mm.
We now had a robot that could go up and down, with a force testing head on it.

Next up, we needed to integrate the force tester. Conveniently, it had a USB port on it and would send every reading out over a serial protocol. Inconveniently, the only client for that undocumented serial protocol was a Chinese-language windows app. The app was able to output to Excel, but we needed to be able to read the output in realtime to know when to stop the 3D printer from driving the force tester through our keycap and switch. A couple hours with a protocol sniffer and we had…some slightly obtuse perl code that reliably read the readings off the force tester.
for ( my $i = 0 ; $i < 50 ; $i++ ) {
    my ( $count_in, $bytes ) = $ft->read(7);
    if ($count_in) {
        my @bytes = split( //, $bytes );
        while ( $#bytes >= 0 ) {
            my $byte = shift @bytes;
            if ( ord($byte) == 0x55 && ( $#current_force_measurement >= 5 ) ) {
                my @result = ( @current_force_measurement, $byte );
                @current_force_measurement = (@bytes);
                if (
                       ord( $result[0] ) != 0xAA
                    || ord( $result[6] ) != 0x55
                    || (   ( ord( $result[5] ) != 0x2C )
                        && ( ord( $result[5] ) != 0x0C )
                        && ( ord( $result[5] ) != 0x5C )
                        && ( ord( $result[5] ) != 0x7C ) )
                  )
                {
                    warn "had bad result in our measurement";
                    return get_next_force_measurement();
                }
                my $value =
                  ord( $result[4] ) +
                  ( 256 * ord( $result[3] ) ) +
                  ( 256 * 256 * ord( $result[2] ) ) +
                  ( 256 * 256 * 256 * ord( $result[1] ) );
                if ( ord( $result[5] ) == 0x0C ) {
                    $value = 0 - $value;
                }
                @current_force_measurement = ();
                return sanity_check_force_value($value);
            }
            push @current_force_measurement, $byte;
        }
    }
}
By watching for when keypress force went over 200g, we could detect when we'd bottomed out.
At this point, the only "hard" bit left was detecting keypresses. Finally, it was time for the Arduino to get put to work. We wrote an incredibly sophisticated custom keyscanner routine for Arduino:
// the number of the pushbutton pin
const int buttonPin = 2;
int buttonState = 0;
uint8_t oldState = HIGH;
void setup() {
  Serial.begin(57600);
  pinMode(buttonPin, INPUT);
  digitalWrite(buttonPin,HIGH);
}
void loop() {
    buttonState = digitalRead(buttonPin);
    if (buttonState != oldState) {
        delay(5);
        buttonState = digitalRead(buttonPin);
        if (buttonState != oldState) {
            if (buttonState == HIGH) {
                Serial.print("0");
            } else {
                Serial.print("1");
            }
            oldState = buttonState;
        }
    }
}
What this code does is: If the switch is toggled on, it prints "1" to the serial port. If the switch is toggled off, it prints "0" to the serial port.
With all these bits together, it was time to test out our force tester, newly christened "Forcy McForceFace".

The force curve for a Kailh BOX Noble Yellow switch. You can find the raw data here.
(Kailh was not the manufacturer with the misbehaving switches.)
After a little bit of tuning and bug-hunting, we had a fully-working force curve tester. Ok, fine, two and a half weeks of tweaking and tuning we had a slightly temperamental, but still totally functional, force curve tester.
If you're building your own force tester and happen to be using the same hardware as us, you might find our driver script useful.
From there, we set about to see what was going on with the weird results we were getting from the switches from the manufacturer we'd been having some trouble with. And indeed, we were able to figure out that some changes the manufacturer had made to the switch design had led to a change in their force curves from when they were first specced.
These days, we occasionally break Forcy out to test out new switches, but it mostly lives a well-deserved retirement in Keyboardio's museum of exotic keyboards.
| Jesse Vincent |
|---|---|
| Handle | obra |
| Location | California, USA |
| First keyboard build | 2012 |
| Links | keyboard.io, fsck.com |
Published on Sun 10th Dec 2023. Featured in KBD #2023.
Related
Quantum Painter tutorial
How to add Quantum Painter/color LCD to (almost) any QMK keyboard – a tutorial by Esse Woods aka OakNinja .
How to organize a keyboard meetup
Gordon Diggs, the man behind the NYC Mechanical Keyboard Meetups, gives us some tips on how to organize a meetup.
Lattice60
PrimeNumber shared the files of the handwired Lattice60, an ortholinear keyboard with standard keycaps and low-poly case.
Maximising the effectiveness of Pro Micros in keyboard design
Moses Hoyt, from STHLM kb, shares his challenges, tips and tricks for overcoming the limitations of Pro Micro controllers in keyboard design.