Keyboard Builders' Digest /
Mantis: Hexagonal Keys in Ergonomic Keyboards
Felix Kühling explains how hexagonal keys work surprisingly well in an ergonomic layout without fine-tuning parameters like hand rotation, column stagger and splay.

Published December 1, 2023

Introduction
I'm Felix Kühling, a software architect and Linux kernel hacker by day, Argentine Tango dancer by night, and ergonomic keyboard enthusiast somewhere in between. My contribution to the world of ergonomic keyboards is the Mantis keyboard, a 40 key, unibody split design that stands out with its use of hexagonal keys. The first ideas for this keyboard started forming in my mind at the end of 2022 after seeing FK Keycaps Hex Keycaps for sale. After mulling over some paper sketches for a few months, I took the plunge in early 2023 and designed my first prototype PCB with the help of ErgoGen. Since then I have gone through three major iterations of my design, which have been my daily drivers through most of this year.
Mantis Layout Explained
The Mantis layout seems to be a head-scratcher or a mere novelty to many people looking at it for the first time. Is it row-staggered or column-staggered? Where is the home row? Why hexagons? What makes this ergonomic? How do you map a QWERTY layout to this keyboard? Let's answer these questions by demonstrating how to transform a row-staggered QWERTY layout into the QWERTY-version of Mantis in five steps.
Starting Point: 30-Key Row-Staggered QWERTY
Below is a "normal" row-staggered QWERTY layout, reduced to 30 keys and with one small modification: Semicolon is replaced with apostrophe, which is more useful for typing.
Many small ergonomic keyboards have 5×3 keys per hand plus some thumb keys, making all keys easy to reach without moving the hands. Open-source keyboard firmware, such as QMK, makes it easy to create additional layers or combos to provide access to the missing symbols, numbers and function keys without reaching and hand contortions. We'll use 30 keys as a starting point and add some thumb keys later.

All the layout diagrams below use the same color code for different fingers. The home keys are highlighted with dark circles.
1. Symmetrical Row-Stagger
First we rearrange the row-stagger to be symmetrical because most humans are pretty symmetrical. This doesn't change much for the right hand. But in the left hand it basically reverses the usual row stagger to align the rows with the angle of the left arm relative to the keyboard.

If the horizontal stagger between rows is exactly 0.5u and the vertical row spacing is just right (0.866u), then the keys form a hexagonal grid and this layout can be implemented with hexagonal keys. This is not very ergonomic just yet, but we'll make it more ergonomic in the following steps while maintaining the hexagonal grid.

2. Staggered Index Finger Columns
Now notice the slanted columns. By changing our point of view, we can think of this as a column-staggered layout with columns angled inwards by 30°. I find that this matches the angle of my arms when resting the elbows on arm rests and placing the fingers on the home row. But the index finger columns are too high. Index fingers are shorter than middle fingers, so we move those columns down to make them easier to reach without moving the hands.

3. Staggered, Reduced Inner Columns
'Y' and 'T' are still hard to reach as they're a long way from the index fingers' home position. We can move the inner columns down once more, but then the bottom keys become too far to reach easily, and start interfering with the thumb clusters.
Maybe six keys for each index finger is one too many. Changing this requires some modifications to the QWERTY layout, though. Less frequent index finger keys 'B' and 'M' can move to the pinkies instead. The pinkies gain one extra key that's easy to reach with splay.

This way we preserve the number of keys, and all keys are now quite easy to reach without stretching or moving the hands. Most keys are still in their usual place or very close to it, and only two keys moved from the index fingers to the pinkies.
4. Thumb Key Arcs
Now we add some thumb keys. Let's start with three for each hand, resulting in a fairly common 36-key layout. The thumb keys are arranged in an arc that makes all three keys comfortable to reach, while still being aligned with the hexagonal grid. Many popular 36-key layouts could be adapted to this keyboard:

5. Four More Keys
The keyboard matrix and the physical footprint of the keyboard can accommodate two more keys on each side. So we can add a fourth inner thumb key and an extra bottom key for the middle fingers for a total of 40 keys.

This completes the Mantis layout in two dimensions. The actual Mantis v0.2 keyboard raises the index fingers and most thumb keys. This approximates key wells, adds slight tenting, increases the separation between some of the thumb keys and makes the innermost thumb keys usable in the first place. Mantis v0.3 adds a sculpted key profile, which reduces finger movement and improves accuracy.
But Why Hexagons?
Only one burning question remains unanswered: Why hexagons? Going back to first principles, there is a very limited selection of shapes that can form a regular 2D grid: triangles, squares (technically any parallelogram would work) and hexagons. You may argue that circles can be used for many different grids. But if you pack them as tightly as possible, they form a hexagonal grid. I don't see any obvious reason that makes squares automatically superior to hexagons. In fact, I can think of several good reasons in favour of hexagons:
1. With square keys, each key has eight neighbours, but the diagonal neighbours are about 1.4 times further away than orthogonal ones and therefore harder to reach for the same finger. A hexagonal key has only six neighbours, but they are all exactly the same distance away. In practice this leads to one less key in the inner index finger columns, but makes the remaining keys more comfortable to use.
2. The hexagonal key shape naturally results in a 0.5u column stagger with a 30° hand rotation.
3. Hexagons are symmetrical under 60° rotation. Mantis v0.3 exploits this property to create a sculpted key profile approximating key wells with only one or two unique keycap shapes.
4. Hexagons look cool. It's a unique and visually striking layout. Anecdotally, several of my friends who would otherwise not be interested in ergonomic keyboards, have expressed interest after seeing my first prototypes.
So why not try hexagons for a change?
Design Constraints
The second point above deserves more elaboration: While the natural column stagger and hand rotation resulting from hexagonal keys is a great starting point, it does constrain the design space for these ergonomic layout parameters.
On the other hand, I feel that fine-tuning the key positions in 2D yields diminishing returns when trying to create a keyboard that's comfortable for many users. See the "Brief History of Mantis" below to see how much can be achieved within these constraints by focusing on other aspects of keyboard ergonomics.
Even without fine-tuning, the Mantis layout feels much more natural than a "normal" row-staggered or ortho-linear layout, resembling existing unibody split designs such as Absolem or Zaphod.
What about Colemak?
Alternative keyboard layouts will need similar adaptations to what we did to QWERTY to deal with the reduced number of index finger keys. For QWERTY this is relatively straight forward. Moving a few keys around is not likely to make QWERTY any worse than it has always been.
In case of Colemak this needs to be done more carefully to avoid undoing some of the major benefits of the layout: mainly the low number of same finger bigrams and avoiding overuse of the pinky fingers. It would also be nice to keep the punctuation characters and ZXCV more or less unchanged. And the number of moved keys should be minimal to make the transition as easy as possible. Spoiler alert: Some of these constraints had to be relaxed.
With the help of a layout analyzer I came up with two versions. This is the Colemak-DH based layout I've been using on my Mantis keyboards all along:

This compromises on the requirement to leave ZXCV unchanged, especially with X moving to the left outer pinky key. And it compromises on same-finger bigrams with "JO" on the right pinky. A slightly more radical version moves around some of the punctuation keys to avoid "JO" on the same finger. I have not adopted this yet.

Similar adaptations could be made to other layouts.
What else could be done with hexagonal keys?
If Mantis is a hexagonal version of a column-staggered layout, then what would the equivalent of an ortho-linear layout look like with hexagons? Well, you won't get anything orthogonal with hexagons because there aren't any right angles. There is always an ambiguity between row-stagger and column-stagger depending on your point of view.
Another way to contrast ortho-linear with column-staggered layouts is, how they accommodate different finger lengths, or rather, don't accommodate them in the case of ortho layouts. The closest equivalent with hexagonal keys could be based on Mantis without lowering the index-finger keys. It would resemble a symmetrically row-staggered layout such as the Katana60 more than an ortho-linear layout like the Planck.

In this simple example we get a 42-key layout, about the size of a Planck keyboard. This might be a great option for a travel keyboard. This layout could be further extended with more keys on the side or an extra row on top. Applying the same rotated switch and sculpted keycap ideas as Mantis v0.3, it may actually be comfortable to type on.
A Brief History of Mantis
Now lets take a brief look at the evolution of Mantis to show how much can be done to optimize ergonomics within the constraints set by hexagonal keys. OK, I admit, I also had some fun with the aesthetics.
v0.1: Proof of Concept

Mantis v0.1 was a flat layout, very similar to the layout we developed above. It was a proof of concept that convinced me that I was on to something. It was usable but it had some problems and lacked some features I was looking for: The inner thumb keys weren't accessible without pressing adjacent keys, the other three thumb keys were a bit too closely spaced, finger travel distances were a bit longer than I liked, while the flat keys made orientation by touch difficult and easily resulted in accidental adjacent key presses. Eventually I also wanted to achieve tenting and some approximation of key wells for more comfort.
v0.2: Adding a 3rd Dimension

The second prototype version v0.2 went 3D. By stacking two PCBs, it raised the index fingers and most thumb keys. In addition to making the index finger keys easier to reach, it also made the keyboard slightly tented. This resembled the design of the ThumbsUp! keyboard, that takes a similar layered-PCB approach to approximate key wells.
One more benefit of the raised center keys was the extra vertical space added between the two rows of thumb keys. This fixed both the thumb key spacing issue and the unusable fourth thumb key of v0.1.
I experimented with different heights and different combinations of headers and M2 standoffs. The two prototypes I built had 6.6mm and 12mm rise respectively. After using both of them for several months, I decided to design the next version with roughly a 10mm rise, resulting in about a 15° tenting angle.
v0.3: Custom Sculpted Keycaps

In v0.3 I left behind the flat Hex keycaps that inspired this keyboard design in the first place. I learned OpenSCAD to create a custom sculpted key profile for 3D printing. The sloping sides and excentric spherical dish practically eliminated accidental adjacent key presses while significantly reducing finger movement and improving accuracy.

The v0.3 PCBs strategically rotate the switches in 60° increments between rows to create a sculpted key profile with only one or two distinct keycap shapes. A key insight was that even the home-row keys can have a tilted top that makes them conform with the 15° tenting angle. Optionally, taller and steeper keys can be used in the upper and lower row to better approximate key wells and reduce finger movement further.
The way I currently have my keyboard setup, it uses taller keys only in the top row, which looks less like the key wells I set out to emulate, but feels very comfortable and efficient.
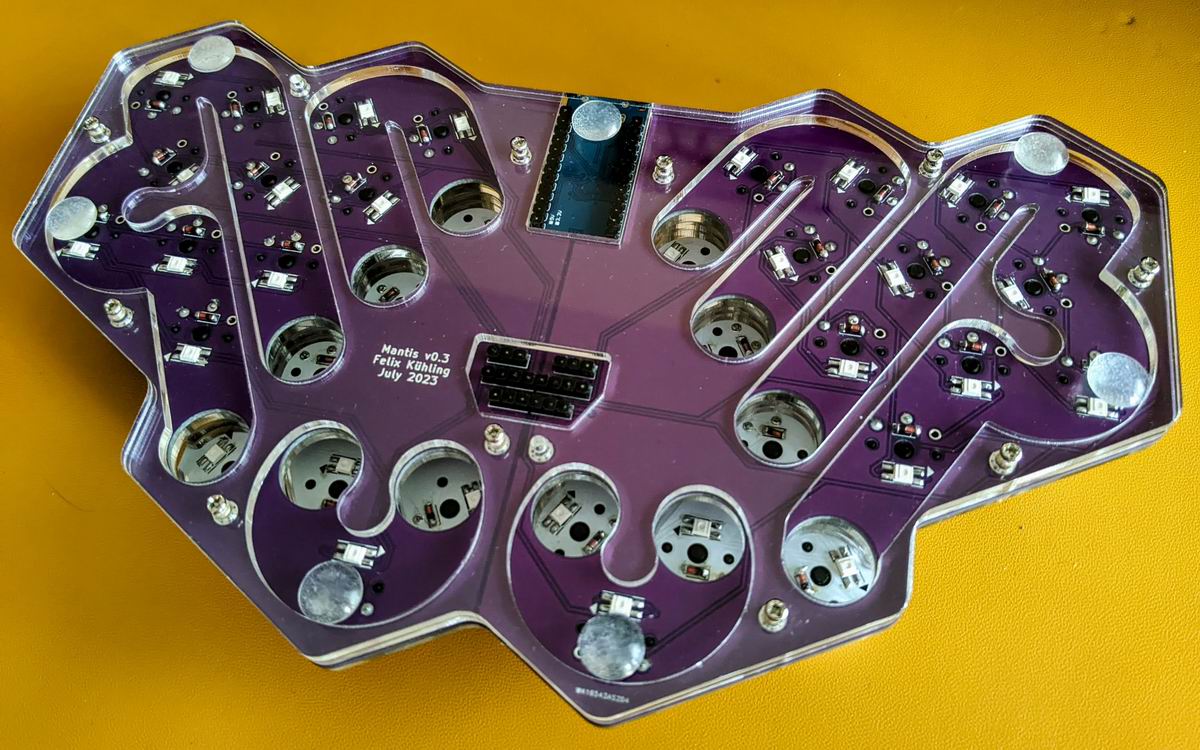
Other major features of v0.3 include split/reversible bottom PCBs for lower cost of prototype PCB production, per-key RBG LED support and a laser-cut sandwich case. The case is designed with long resonant sound channels meandering under the PCBs to make this small keyboard sound bigger.
A minor revision v0.3.3 of the top PCB corrects the inner-bottom index finger key rotation. It also adds an optional level shifter to support RGB LEDs with more modern ProMicro-compatible controllers that use 3.3V logic. Some minor updates to the case match the modified key rotation in the top switch plate and slightly improve the overall fit. As an experiment I made the sound channels asymmetric, so they resonate at slightly different pitch for left and right hand keys.
What will I work on next?
Mantis v0.3 is very usable and the assembled prototype almost feels like a finished product to me. I'm very happy with how comfortable this layout is to use everyday. In my totally biased opinion, this is by far the most comfortable keyboard I have ever used.
This holiday season I'm busy building a handful of Mantis keyboards for family and friends. I'm looking forward to their feedback.
In the next months I want to work on making Mantis easier and cheaper to build, to make it accessible to more people. I'm thinking about 3D-printed case options instead of laser-cut plates and I want to learn how to get most of the fiddly components (diodes and LEDs) assembled by the PCB-maker. This would be v0.4, or arguably I may justify calling it v1.0.
For the next big revision I would like to add a track pad or trackball in the middle of the keyboard. I should be able to fit one without making the keyboard any bigger, if I sacrifice the innermost thumb keys.
I'm also feeling slightly tempted to design and build a 42-key honeycomb/candy-bar keyboard with hexagonal keys.
| Felix Kühling |
|---|---|
| Handle | luckybipedal, fxkuehl |
| Location | Toronto, Canada |
| Occupation | Software Architect, Linux Kernel Hacker |
| Joined (the hobby) | 2019 |
| Niche | Hexagonal keys |
| Fav. switch | Sunset (Choc v1), Gateron Red (MX) |
| Fav. keycap profile | Custom hexagonal sculpted, KAT |
| Other hobbies | Argentine Tango, Custom Bicycles, Ukulele |
| Links | https://github.com/fxkuehl/ |
Published on Fri 1st Dec 2023. Featured in KBD #2023.
Related

BLE HEX macropad
Piotr Wilk published a small BLE macropad sporting HEX keycaps.
Mantis with Hex caps
The Mantis prototype, shared by Felix Kuehling, is designed around the Hex caps.
Mantis keycaps
Felix Kuehling released the updated keycaps for his Mantis keyboard.
HEX keycaps
HEX keycaps have a low-pro hexagonal profile – designed and manufactured by s-ol and FKcaps for Choc switches.