Keyboard Builders' Digest / Advent Calendar
Squeezebox Scorecard
Peter Lyons reviews results of over a dozen experimental DIY keyboard feature prototypes he has built within the Squeezebox R&D and how each fared in hindsight.

Published December 3, 2022
Introduction
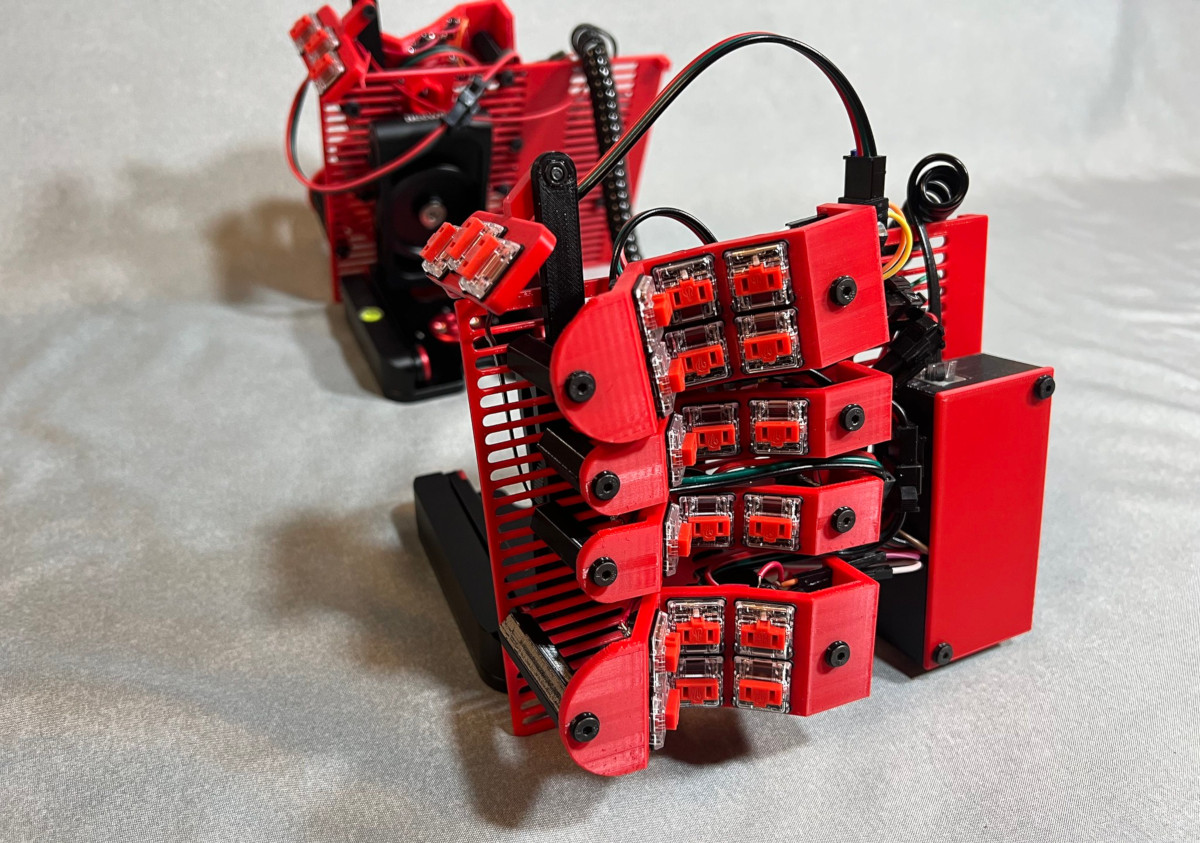
Hi! I'm Pete Lyons and I have a background in backend software development as well as saxophone playing. I've been working on a unique split ergonomic keyboard project called the Squeezebox since winter of 2021. One of the main driving factors in this build is reducing overall hand movement by putting smaller switches within easy reach of the fingers. It is in the same group as the Azeron or Datahand, but never does fingernail-side switches which don't feel comfortable to me.
Squeezebox Scorecard
In this article I'll review some of the design experiments I've conducted in my squeezebox prototyping efforts and discuss each individually through the lens of an experimental hypothesis, trial in a prototype build, and results.
The scooped column: 3 switches at 100° & 160° angles

This is probably the most fundamental idea that drove me to build the squeezebox. I played saxophone most of my life and it can be played very fast and accurately using primarily the pads of the fingers in a trigger motion, not the points of the fingers in a typing motion. I thought these should be combined with the pad resting on one "home corner" switch and the point resting on another switch, either of which could be pressed without moving the hand or the base knuckle.
Result: Yup, it's good. Certainly for index, middle, and ring fingers. It's less clear for the pinky and not applicable to the thumb.
The home corner 1-finger chord

By poking at the corner between row 1 and 2, both keys could be chorded down with a single finger.
Result: Abandoned with caveat. Not reliable on current QMK. Might be possible with more carefully tuned/specialized handling in firmware, but too many misfires during testing.
Type directly on choc stems without keycaps

This was not really a design intention, it was just a kludge/shrug that fell out of early prototyping of the scooped column where tight spacing made it impossible to fit keycaps in and get the corner mechanics that I wanted.
Result: Works fine. Has been in every squeezebox prototype.
Mechanical adjustments with slots and bolts for tailor fit

I wanted to adjust the column offset near/far on a per-finger basis and be able to adjust fit without reprinting any parts or rebuilding any wiring. Early prototypes had the slots on the keywells and later slots were moved to the base plate instead.
Result: Yup, works fine within a certain narrow range
Custom near/far tailor fit
Hypothesis was that each column should be adjusted with fine granularity to fit the varying lengths of fingers and distance between the knuckle and the finger tip.
Result: This is only really true for the pinky. For my hand, index, middle, and ring the offset is so small that even having them all the same is fine for me.
Custom column height for each finger

The hypothesis was that each column should have a finely tuned height to exactly fit each finger's natural resting position.
Result: Only really true for the pinky finger. For the index, middle, and ring fingers it's actually better to have all the same height so proprioception can sense where the bottom is across fingers.
Height adjustment with threaded bolt

The hypothesis was each keywell could sit atop a post incorporating a nut and bolt such that by twisting the post you could easily adjust the height.
Result: Abandoned. Height changes are not that necessary and it's really just about getting the pinky right. This was a bit too fiddly and easy to go out of adjustment so I abandoned it. The idea still seems kind of neat though.
Per-finger granular splay tailor fit

The hypothesis was as the fingers extend, each column should closely follow the natural splay angle.
Result: Mixed. I don't like any on the ring finger, a tiny bit for index is OK but probably not necessary, and a moderate amount on the pinky I think is legit but also might be unnecessary.
3D print many small components and assemble into a product mechanically
The hypothesis was iteration will be faster and cheaper and easier to motivate with a componentized approach instead of dactyl-style large complex parts to print.
Results: Holds true for prototyping for sure. If this were ever to get to production run quality, there's probably a flavor where at least the 4 fingers per hand type on a single large part containing all the columns and switches.
Mechanical adjustments with magnets on a steel plate

The hypothesis was granular adjustment of keywell position across both axes of a base plate can be achieved by each keywell having strong magnets in the base and mounting them on a steel base plate.
Results: Abandoned. It's too fragile and easy to accidentally reposition. Won't hold up for transportation, etc.
Chopped chocs for tighter spacing

I observed that even the smallest commercially-available switches seemed too far apart for my aspirations. I learned on discord that at least 30% of the area of a choc is non-essential space for housing a LED. That section of the switch can be cut off and the switch will still work fine. I did not invent this approach and probably never would have thought to do so. I learned about this on discord from others who had already pioneered it.
The hypothesis was to adopt this technique to pack switches closer together. This was first incorporated as an swap-in index column component (yay modularity!) in a 2x3 index column so the innermost reach column could be as close as possible to the home column.
Result: Validated. It's a lot more work, hard to do consistently with DIY tools, and makes it much harder to seat a switch into a housing once it's chopped, but it's worth it in my opinion. It's a close call though. The tight spacing does not cause me any issues in typing; No mistypes by hitting neighbor keys by accident. So the technique works, but whether the tighter spacing is worth the significant extra work in building the keyboard isn't clear. For now, yes, it's worth it. 3 or 4 prototypes further down the road, I wouldn't be surprised if my motivation runs out.
Wide split (shoulder width)

The hypothesis of split keyboards: put them further apart.
Result: Yup, it's great. I've been doing this since my first ergodox in 2013 and no regrets.
Steep tent (80°)

The hypothesis is that hands should be turned with palms facing inward, similar to how they are when resting at your side while standing and relaxing. This reduces ulnar rotation and is a straighter path for muscles and tendons when compared to traditional position with palms down facing the desktop surface.
Result: Still unclear. Ergonomics seem clearly superior but logistics are very hard. It requires a large stand that is not very portable. It's really easy for the halves to want to rotate in place, slide around, get misaligned, or topple over. Tenting also gets in the way of reaching around the desk for mouse, coffee, etc. Easy to smack into the keyboard.
I spent a lot of energy and time on this one:
- custom tenting posts
- Z camera stands
- bolting things to the desk
- various ways of attaching to chair armrests
- etc
I'm thinking about trying to go back to flat on the desk as long as the ulnar rotation doesn't hurt.
Low activation distance

Hypothesis is that (warning: keeb heresy) laptop keyboards with their low activation distance and solid bottom out are better for me to type on. Chocs are better than MX, and choc minis are a teensy bit better than that even, but I still want even lower. On choc minis I still push the switch thinking it typed, but didn't press down far enough and it doesn't actuate.
I did some prototyping with mouse switches and plan to continue some more in the future, but the truly tiny size of those things is really hard to work with in a DIY situation.
The scooped column: 4 switches at 100° & 160° angles

The motivation came out of daily driver work on v2112 noticing my index reaching for the innermost column was throwing my hand off position and causing de-homing and typos. The hypothesis is that each finger should stay in exactly one column and never reach across to a neighbor column. I've eliminated the outermost pinky reach column from my builds since just after v2112, but the innermost index column remains on my daily driver setup still.
The challenge is once you remove that column, you get deep into obscure layout land and can no longer implement any popular layout including qwerty, dvorak, colemak, etc. But the premise is with 2 1x4 columns on each hand that's 13 switches per hand which is enough for the entire English alphabet without any punctuation.
I have a prototype build and mapped with a variation on the engram layout.

Results: I am still practicing and learning the engram layout, so no true results yet, but likely will be fine for index and middle but not ring nor pinky.
Hand wiring on columns to PCB inside the case

The challenge here is the scooped columns don't really work with flat PCBs. They make flexible PCBs which BastardKB incorporates nicely, but I'm mostly at too early stages of prototyping to wait for flexible PCB iterations, so I have gotten by with hand wiring so far. Early builds were wired straight to the MCU and only recently have I added a small PCB to help tidy things up.
Result: Seems OK. My more recent builds are down to 32 switches total, so I don't think I actually need diodes anymore if I switch to MCUs with more GPIO pins. I could probably get away with a very simple PCB that just houses some TBD plug connectors: one for each finger's column and the MCU footprint plus some mounting holes.
Future Aspirations
Pointing device: I'd love to get one or more pointing devices integrated. Either a touchpad (there's a very interesting prototype doing the rounds on reddit lately), or a small trackball, or a trackpoint or some combination of these, plus a scroll wheel would be great.
Your Ideas and Suggestions
I'm always inspired by suggestions from the community so feel free to send me any ideas you have!
| Peter Lyonsfocusaurus |
|---|---|
| Location | NY, USA |
| Description | I just thought the rows could be closer together |
| Occupation | I run creative retreats for coders |
| Joined | 2013 2nd ErgoDox Mass Drop |
| Niche | Deep scoops, mechanically adjustable |
| Fav. switch | Kailh Choc Mini Black |
| Fav. keycap profile | NONE: I type on bare choc stems |
| Other hobbies | saxophone, woodworking, sewing, rock climbing |
| Site & blog | https://peterlyons.com |
| Focus Retreat Center | https://focusretreatcenter.com |
| Hackaday | https://hackaday.io/focusaurus |
| Printables | https://www.printables.com/social/121068-focusaurus/models |
Published on Sat 3rd Dec 2022. Featured in KBD #106.
Related

One year of kbd.news
Tamas Dovenyi, the guy behind kbd.news, sums up one year of the blog touching on a wide range of topics from visitor stats to new features.
DIY keyboards I built in 2022
While focusing on the charm of the 21 DIY keyboards he built in 2022, Daihuku will also introduce two keyboard meetups held in Japan.
The Data Driven Future of Switches
The always verbose and never short on switches ThereminGoat gives his take on the data he has collected with switches in the previous year as well as what the future may hold for such.
/r/MechanicalKeyboards, a Year of Changes
Large communities are difficult to appease, and even more difficult to keep organized. This year, /r/MechanicalKeyboards has undergone many significant changes.