Keyboard Builders' Digest / Advent Calendar
The Handwiring Guy
Joe Scotto, the self-proclaimed “Handwiring Guy” sums up his last few months designing and building handwired keyboards.

Published December 2, 2022
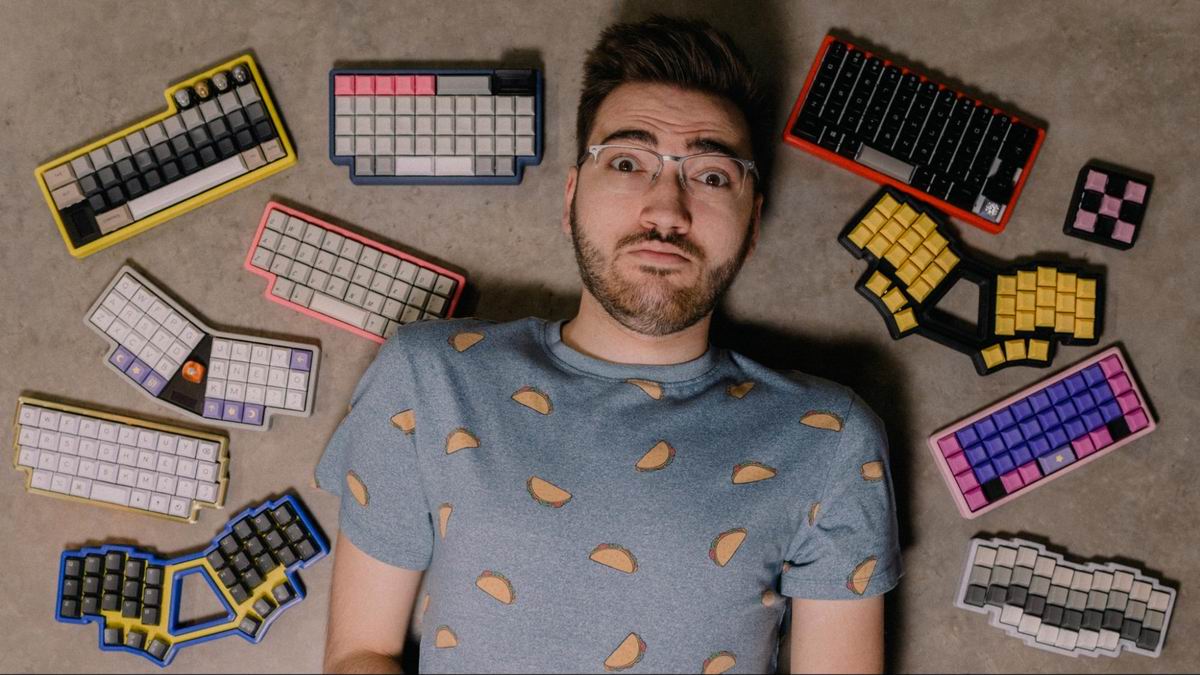
My name is Joe Scotto but most of you probably know me by my creative and unique username @joe_scotto. I’m the self-proclaimed “handwiring guy” and over the last few months, I have been completely consumed with designing and handwiring keyboards. I figured for this special issue of KBD, I would talk about how I got into the world of handwiring, the challenges I often face, and some of the other things I do in the keeb world.
So let’s get into it…
How it Started
My earliest experience with handwiring was only a few months ago when building a Corne split keyboard. I wanted to do something different and designed a case to convert the board to an ergonomic monoblock and reposition some of the sixth-column keys into the middle. I prepared the case and plate without knowing anything about keyboard matrixes and just started messing around. My only knowledge going in was that the keys needed to connect to the diodes in a certain way. About an hour later, the keys were working. It was surprising just how simple “hijacking” the matrix was, and soon after, the AssassinCorne was born.
My journey into full handwiring started only a few days after the AssassinCorne and a PCB manufacturer reached out to me with a sponsorship. I turned them down due to PCBs being outside of my comfort zone but in doing so, and the way my brain works, I got curious. While researching keyboard PCB design I started coming across handwired builds and quickly found out that it isn’t all that complicated. Basically, when a key is pressed, the x and y coordinate is sent to the controller. If you’re interested in a deeper dive, I have a full tutorial video on my YouTube channel that goes over everything you would need to know about building handwired keyboards.
I wanted to take a moment to give a big thanks to Matt3o and his “Anatomy of a keyboard” article. I highly recommend reading it as it goes into detail on key spacing and overall tolerances to follow. Until finding that article, I was designing my own cases but the plates were just modified from open-source files. It gave me a much better understanding of what a key unit is and gave me the ability to design my own plate and case for my first handwired board.
My Handwiring Journey
On September 19, 2022, I built the Scotto40. It was a simple 3x10 ortholinear board with a somewhat weird bottom row. I originally wanted to use a 2u spacebar but had to scratch that idea due to tolerance issues which we’ll talk about more later. The Scotto40 was my entry drug that to my surprise just worked without any debugging. After that, my descent into madness began and I was pumping out a few boards a week.

My next board was a bit more ambitious than the Scotto40. I wanted something more ergonomic and to incorporate an OLED display. After messing around for a while, I designed the Scotto36. It has about 15 degrees of angle on each half and incorporates a 128x32 OLED. After building the board I wasn’t a big fan of the blank space in the middle above the OLED so I took a switch stem, cut it, and glued it in place to give me a place to display my artisans.
After the Scotto36, I wanted to build something a bit weird and use stabilizers. That’s when I designed the ScottoSlant which was a 0.25u staggered keyboard with a total of 37 keys including a 2u spacebar. This was my first board that used a stabilizer and took many hours of prototypes to get it working without jamming. It was partially inspired by the Pain27 but a lot more usable.
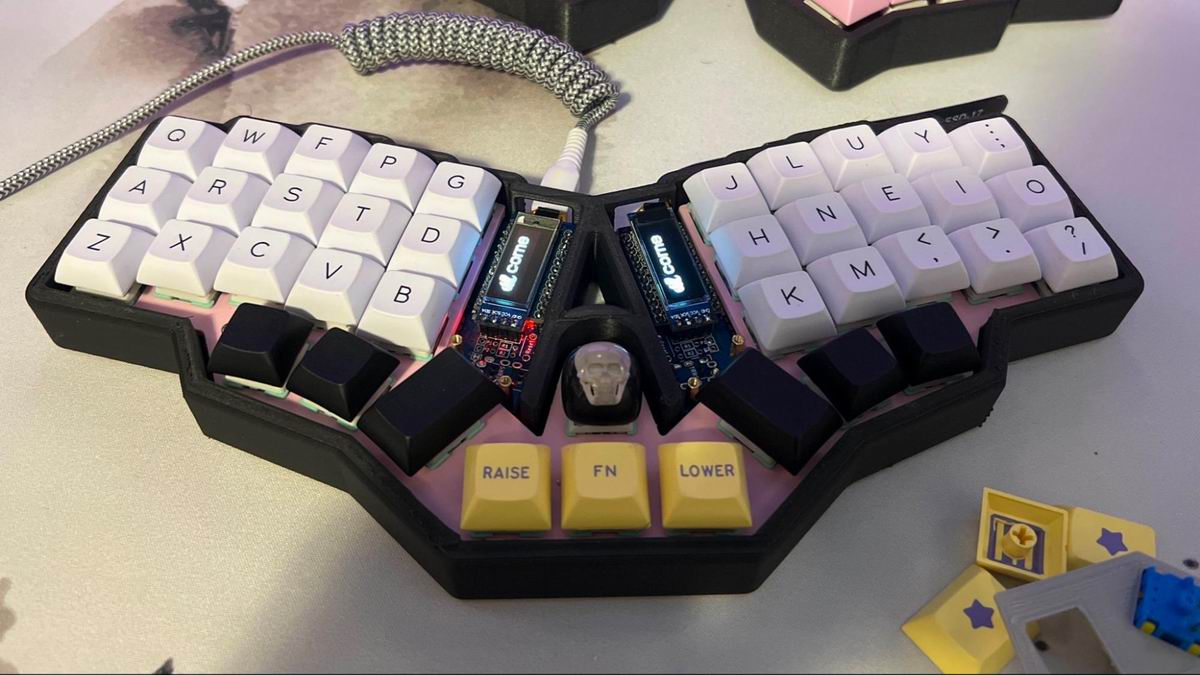
I now had a lot more confidence with stabilizers and wanted to do something with that newfound knowledge. My next board was the ScottoCMD and it had the typical 3x10 layout as my other boards but used a 6.25u spacebar. Because of that long spacebar, I didn’t want to map my tab and enter keys to the bottom row as usual so I decided to move them for ease of access. I decided to put tab and enter right above the 128x64 OLED. The layers are in the normal spot to the right of the spacebar, which although a bit of a reach, works fine. I’m also able to display a bunch of my artisans on the macro row which is neat.
The ScottoCMD put me into an OLED phase where I wanted to do something very different. That’s when I created the ScottoGame which yet again was a simple 3x10 ortholinear board but this time I added macros for gaming on the left side, a 2.75u action button, and a raised 128x64 OLED that was angled 60 degrees. My OLED phase quickly ended with this board because I realized that although cool, they’re not really that useful. All my OLED boards basically use the same variation of Bongo Cat and the current toggled layer. This board however is a great example of why I love and think 3D printing handwired boards is so great. You can really build anything your mind can think of with very few limitations. As a side note with this board, I do wish I put the spacebar directly in the middle. I find when using this board for it’s intended purpose, gaming, my thumb tends to fall right there.

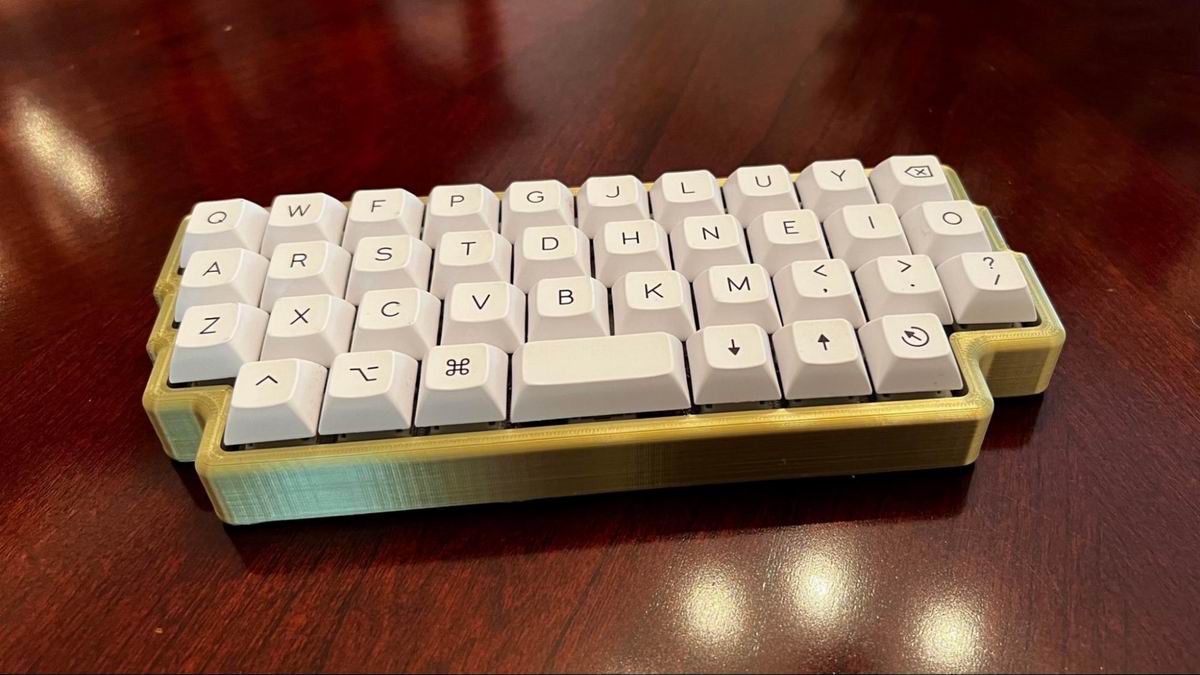
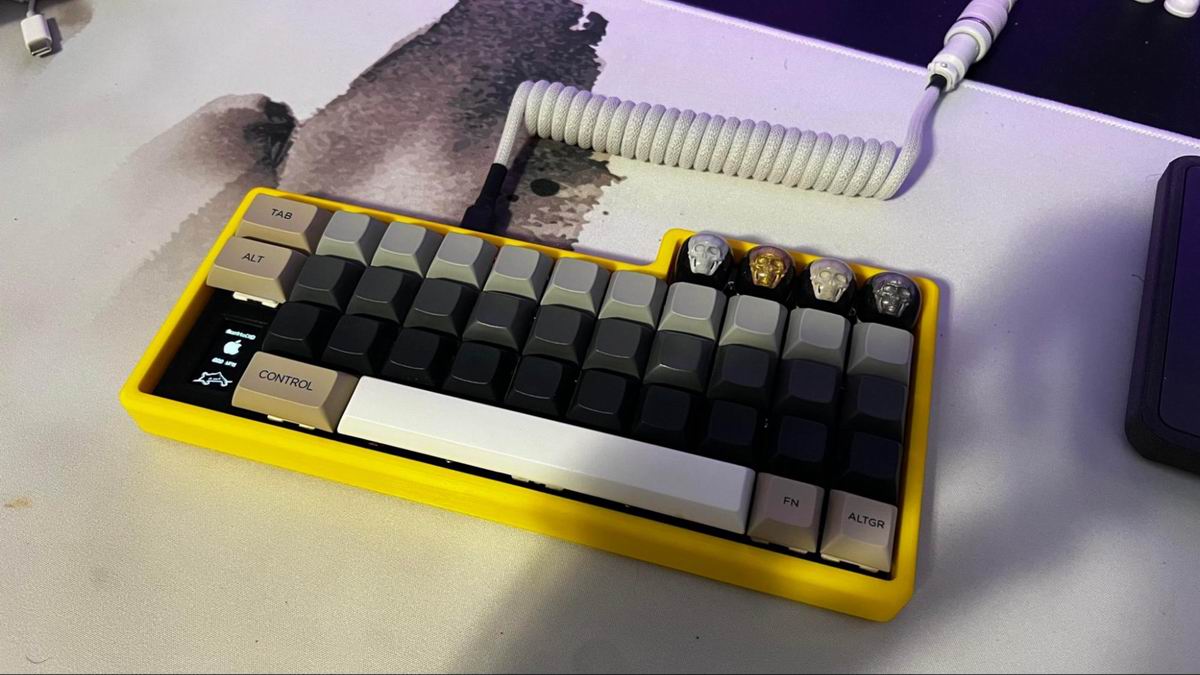
Now at this point in my journey, I kept looking at this old 1980s Apple M0116 keyboard I had laying in my basement. The board use Alps SKCM orange switches that I originally was going to use on my Corne Nano but decided to go with Alpacas instead as the keycaps from the Apple keyboard wouldn’t really work. What I ended up doing is designing a board called the ScottoAlp that was compatible with both MX and Alp switches. The only problem with this was that I wanted to use the spacebar from the Apple keyboard but getting the weird stabilizer from it working wasn’t something I wanted to mess around with. I ended up just using an MX switch with a 3u spacebar and the problem was solved. Luckily one of my keycap sets had a 3u cap that almost perfectly matched the original Alps keycaps, you have to look really close to see it’s not actually from the same board.
Alps orange switches have to be some of the best tactiles I have ever used. It’s just such a shame they aren’t produced anymore and sourcing them can get very expensive. Luckily the board I ripped mine out of was a $5 thrift store find from a few years back. My rough estimate based on prices I found online is that the 34 Alps of the ScottoAlp would cost $100 for just the switches. Not to mention the fact that Alps keycaps are almost non-existent.

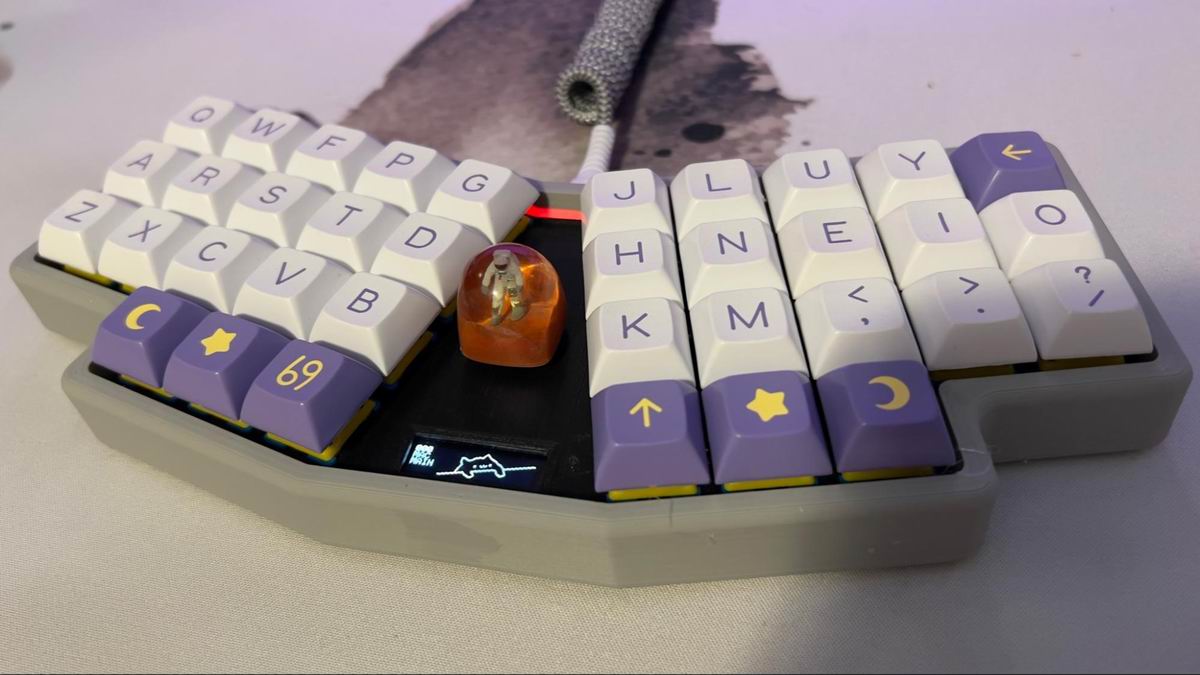
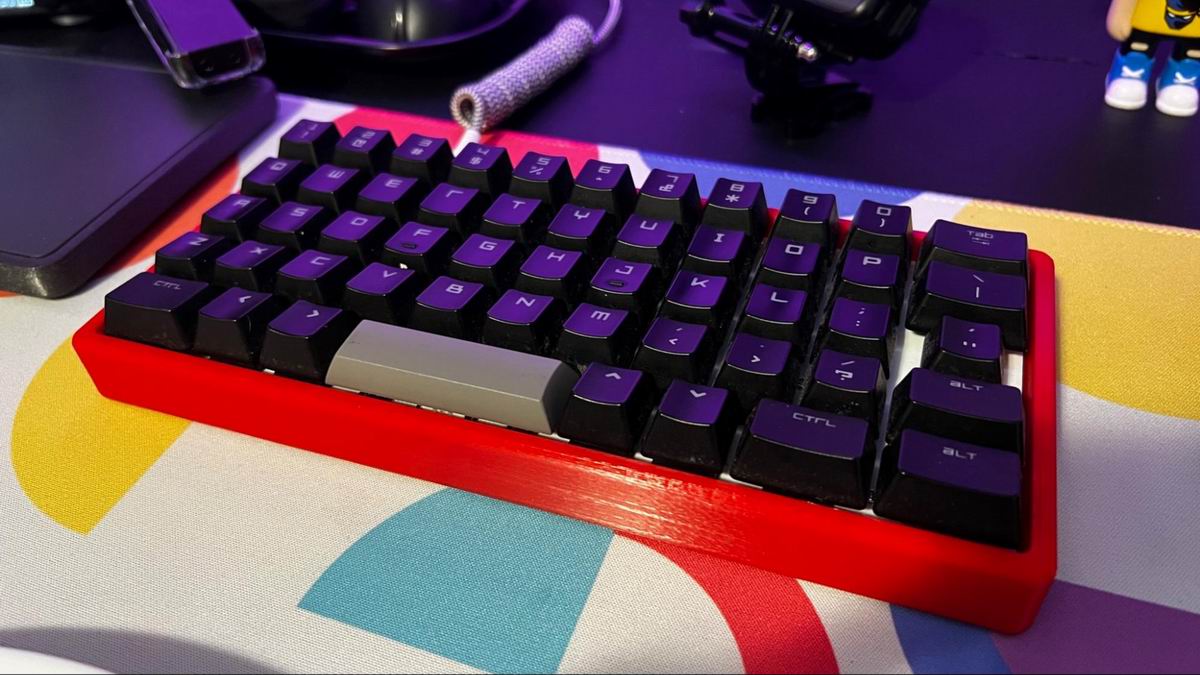
The ScottoAlp taught me something important about tiny keyboards and it’s that they aren’t that comfortable. Now, don’t get me wrong, I absolutely love my small keebs but I really wanted my “endgame” board. My only real requirements for this were that it needed to be a monoblock, have 36 keys, and be ergonomic. I messed around for a few hours and eventually came up with the ScottoFly, named that way because it looks like wings. I wasn’t a big fan of what would be a blank space in the middle so I incorporated it into the design with a cutout that doubles as a handle. This is the most comfortable board I have ever made and uses 20 degrees of tilt on each half. It also happens to be the board I am typing this on right now.

I’m sure by the time this article gets posted I would have made more but as of writing, the ScottoInvader is my most recent board. This was really just something I wanted to make because it would be unique. I think it looks like a Space Invader, hence the name. It also surprisingly isn’t all that uncomfortable to type on. This board was a bit annoying to build though as I had to bend the wires quite a bit to accommodate the 0.25u column stagger.

Building and 3D Printing
I feel like this wouldn’t be complete without some info on how I build these boards. As previously mentioned I do have an entire video on YouTube that goes very in-depth on how everything is done exactly but here is that process simplified. These examples will be shown with the ScottoAlp.
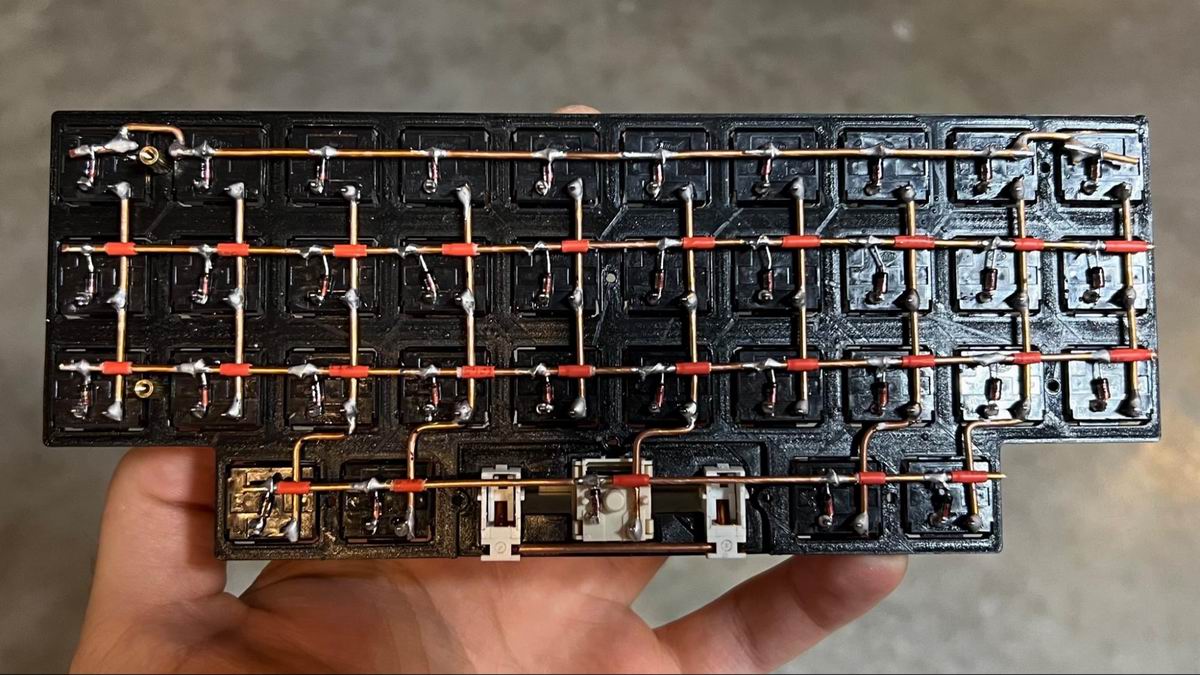
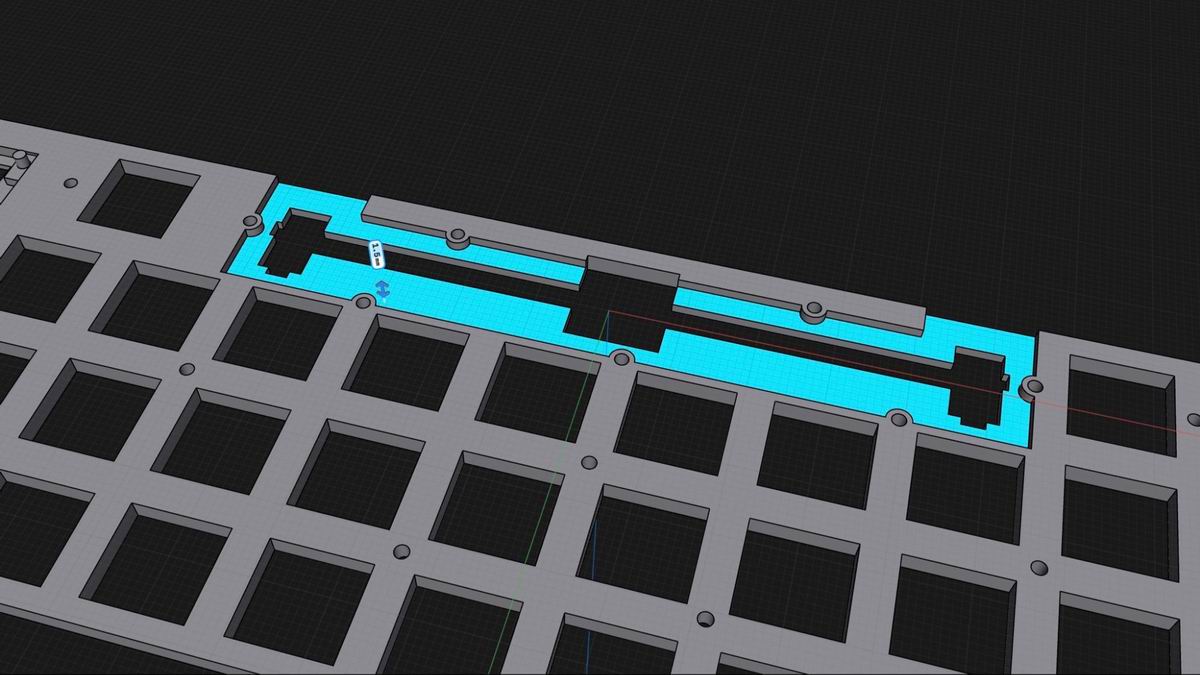
First, the matrix is wired up by connecting half of the pins to a wire defining the rows and then connecting the remaining pins to a diode which in turn connects to another wire to define each column. The diodes are used to give the board N-Key rollover and just allow current to only flow in one direction. Take note of the red sections, I use raw copper wire to give the board strength but because of this, there is the possibility of shorts. In order to prevent this, I wrap the intersecting points with heat shrink tubing. I think this way of wiring is much cleaner and sturdier than other methods.
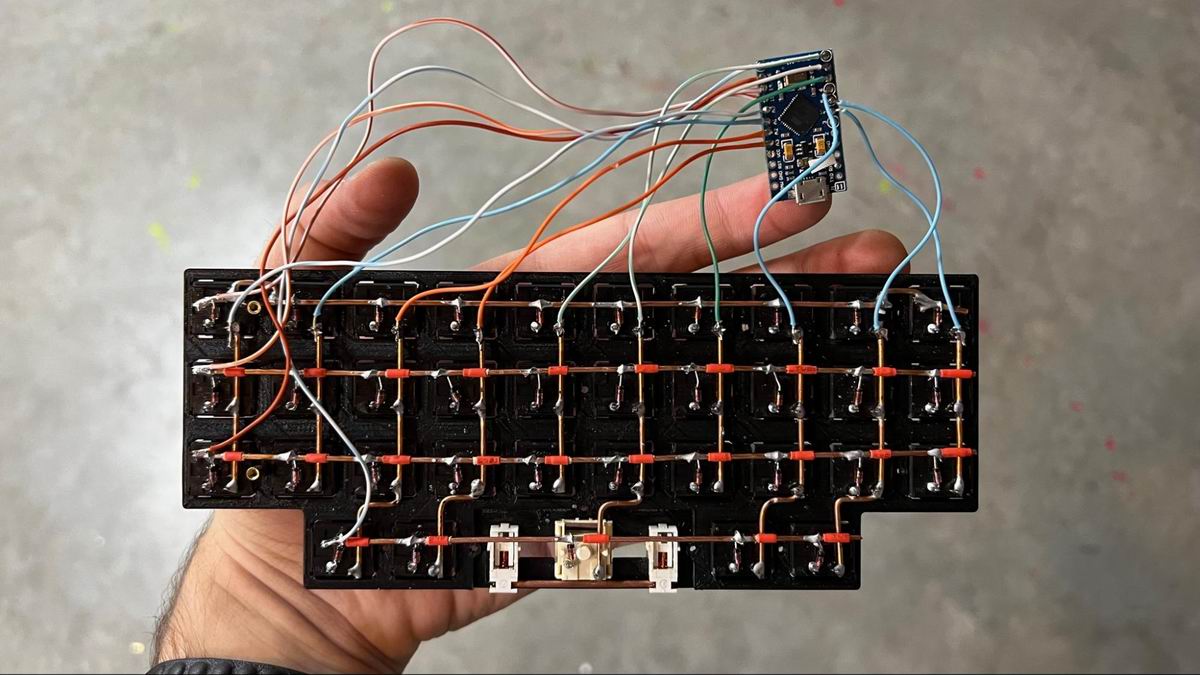
After the matrix is defined, each row and column can simply be routed to pins on the controller that get defined within QMK. All that happens when a key is pressed is that it completes the circuit and the controller can pinpoint the x and y coordinate. After this, the board is basically complete. All I have to do next is test it, hot glue the controller into the 3D-printed case, and screw everything together. Sometimes I have to debug shorts but most of the time the system I made just works without any issues.
As for the 3D-printed plates and cases, I do something a bit special there too. Normally a 3D print will use something called “infill” which basically saves material by printing most of the interior hollow. Obviously, a hollow print would make a keyboard that sounds hollow so what I do to get around this is print my cases and plates completely solid. The only downsides to this are that it uses a lot of material and takes about 28 hours to print, but I think this is a fine tradeoff. By printing my cases this way I’m able to make them sound a lot better than other 3D-printed boards and they end up being a lot heavier which in turn makes them feel a lot more premium.
Tiny Keyboards Explained
One of the most common things I’m asked is how I use these tiny keyboards. In order for a board to be useful to me, it should have at least 36 keys. Since my boards typically are a 3x10 layout, this means I don’t have shift, tab, enter, backspace, or punctuation in the normal spot. I get around this with some very useful QMK features such as hold-tap where my space bar acts as space on tap or command on hold. I also have my right thumb cluster to act as tab or enter on tap and toggle my code or number layer on hold. Shift is simply mapped to on hold of Z or question mark. Backspace would have been where semicolon is but since I’m a Colemak user, I was able to map that to a more traditional space on the top right. Most of my punctuation is moved to my “code” layer along with arrows and media keys. Numbers and symbols are just on another layer with a focus on home row.
I try to use basically the same exact layout on all my boards so that when I switch between them, I don’t have to remap any muscle memory. I also try to keep as much as possible on home row in order to limit finger movement as much as possible. I’ve been using the same number and code layer for over 2 years now and to this day still think it’s superior to any other layout although many would argue it isn’t.

The Project
When I made my first handwired board, I figured it would be cool to release all of them for free so anyone could download, print, and build them. There are however a few rules I try to follow. The main one is that all the boards I design should fit on a standard 220x220mm print bed. By limiting the project to this sized 3D printer I can ensure that the largest amount of people can actually make them. Most importantly however is that the project should be boards that I would personally be able to use.
There of course have been a few exceptions to these rules such as the board I built for my mom, the ScottoStarter. This board does fit on a standard 220mm build plate but, it has way too many keys for me. I like my boards to keep as much on home row as possible and pretty much exclusively use 36 key layouts. This board has an extra row for those keys that I would normally have to remap. It also uses a 3u spacebar with a custom stabilizer wire, which was not very fun getting right in regards to tolerances.
I also sometimes design boards and then give up on them leading to a whole “abandoned” branch on the project repo for these. If I’m not feeling the board, I don’t try to force it. This has been happening more and more lately as I run out of ideas. To solve this, I plan on making larger boards but we’ll talk more about that in the next section.
Challenges and Issues
The biggest challenge I face is that I’m quickly running out of ideas for new boards. I want to start making boards that are bigger than the standard 220x220mm build plate, but there are a few issues with that. I could just design larger boards for larger printers but then that would not be true to the rules I set for the project. Another possibility is splitting the board into multiple parts and gluing them together but that leaves you with an ugly seam. I believe the solution is to break them up but I will need to get creative with the seam and instead of having it as a negative, incorporate it into the design of the board. There also is the question of strength with the seam, which is obviously a large weak point.
By far the most annoying thing I’ve faced has to be stabilizers, they give me such a headache almost every time I design a board with them. Since my boards are handwired, I need to use plate-mounted stabilizers but those require a 1.5mm plate. I print mine at 3mm to improve the overall feel and sound. The way I’ve gotten around this is strategic cutouts to mix the 3mm plate with the 1.5mm portions required for the stabilizer. However, those cutouts don’t solve the tolerance issues with stabilizers. Normally tolerances aren’t an issue with things like cases and switch cutouts but when it comes to stabilizers a tiny difference means it will constantly bind. This leads to a lot of back and forth trying to redesign the plate with tolerances in mind or adding a ton of screws around the stabilizer to help hold it in place properly. The best solution I’ve found to this issue so far is to use heavy switches for stabilized keys and normally, that solves the issue.
Other Ventures
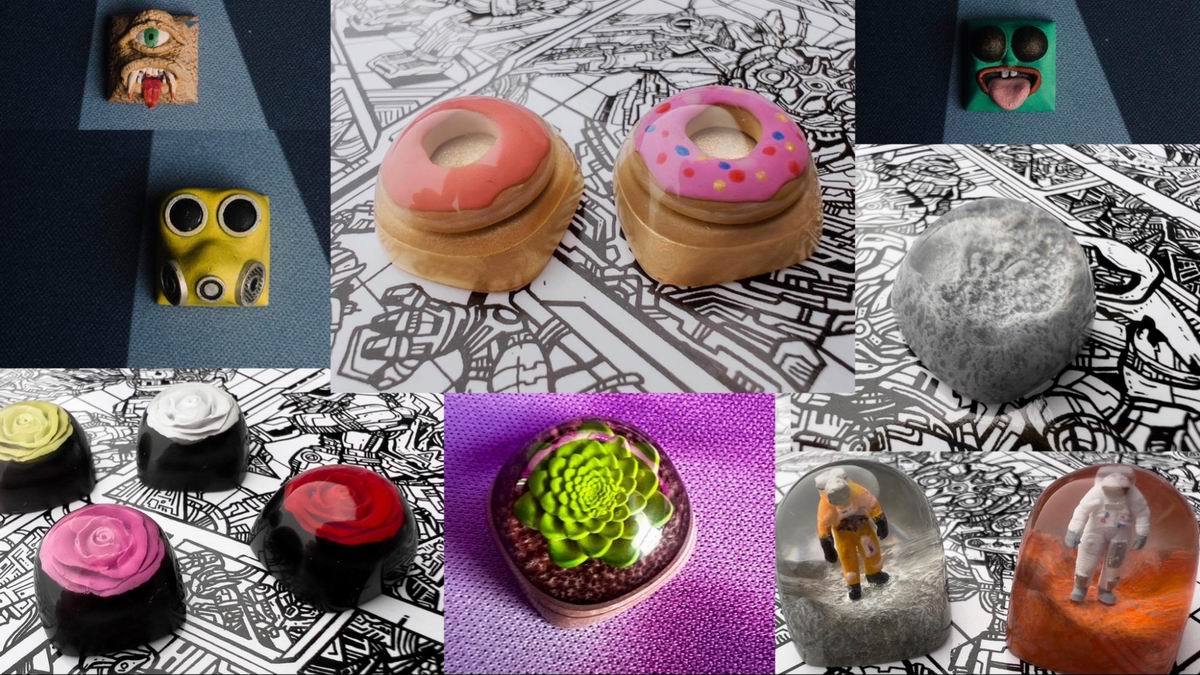
Handwiring is my largest project but I also do a few other things with keebs. Mainly, I make artisan keycaps and have been for a few years now. All the artisans shown are my own.
I guess this is the section for my shameless sales pitch but I sell keycaps, cases, kits, and full keyboards over on scottokeebs.com. Not only do these fund myself, life ain’t cheap, but a lot of the money ends up getting put back into the project so I can give the files away for free.
Bye for Now
I hope you enjoyed this and I have to give a massive shout-out to Tamas for his work on KBD and for inviting me to take part in this special issue.
If you’re interested in learning more, you can find me on YouTube as just “Joe Scotto”. I do videos on builds, QMK, 3D printing, and lots of other stuff related to handwired keyboards. I’m also on Reddit, Instagram, and Twitter as “@joe_scotto”.
| Joe Scotto (23)joe_scotto |
|---|---|
| Location | Syracuse, NY |
| Description | 3D Printed Handwired Keyboard Builder |
| Occupation | Maker of Things. |
| Joined | 2019 |
| Niche | Handwired Keyboards |
| Fav. switch | JWK Lil’ Tyke Linears |
| Fav. keycap profile | DSA |
| Other hobbies | Drones, Videography, Photography |
| Links | https://youtube.com/joe_scotto, https://instagram.com/joe_scotto, https://twitter.com/joe_scotto |
Published on Fri 2nd Dec 2022. Featured in KBD #105.
Related

The three angles of ergonomics
Where do you start when you want to design keyboards with more ergonomics? A bit of basic keyboard science by nerdbude of the CCH podcast.
Why on earth should a keyboard do that?
Nick Brassel (@tzarc), one of QMK’s Directors, wasn’t satisfied with keyboards only having switches and an indicator LED or three.
On collecting and modern keyboard innovation
Thomas, the guy behind the Chyrosran22 YouTube channel, sums up how keyboards changed during the last fifty years and takes a look at the explosion of innovations that have happened in the field over the last few years.
One year of kbd.news
Tamas Dovenyi, the guy behind kbd.news, sums up one year of the blog touching on a wide range of topics from visitor stats to new features.