Keyboard Builders' Digest / Projects
Wooden keyboard case with LED bar
Diego talks about how he made the custom wooden keyboard case with LED light bar.

Published February 11, 2024
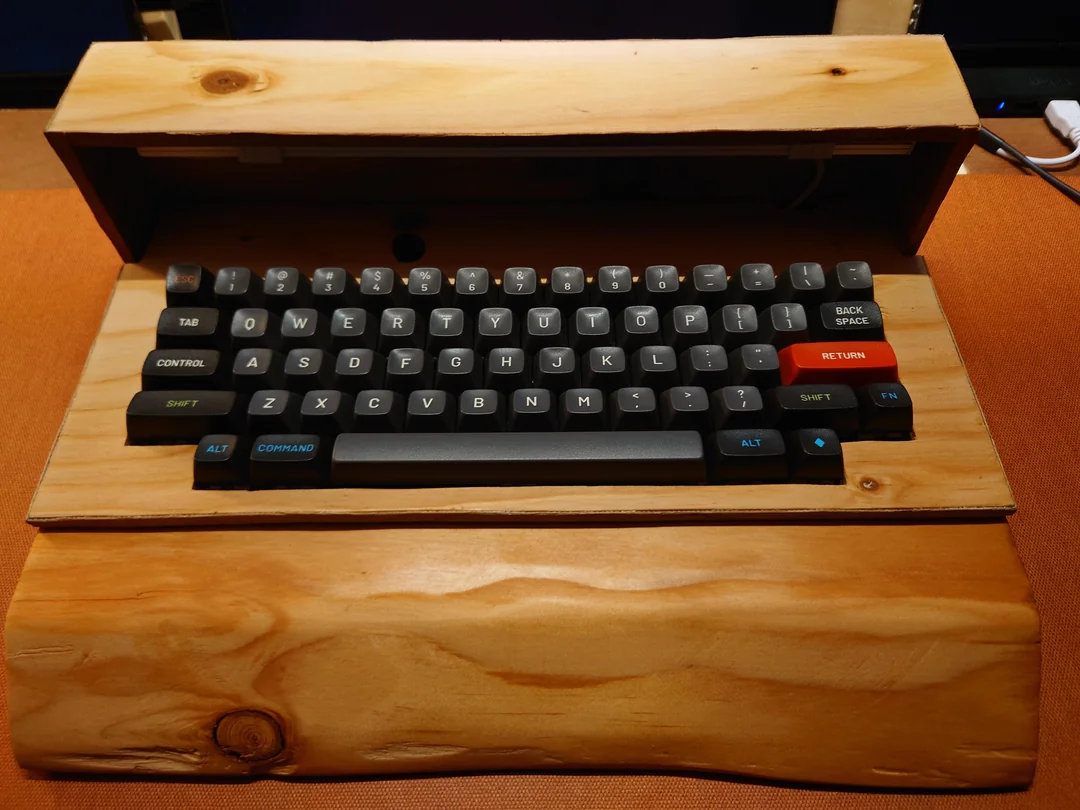
The main idea behind the case build was to be able to showcase the keycaps. I’m a big fan of SA and MT3 profile, as I have an affinity for vintage keyboard and in general, love the retro style and design. However, there is no or limited shine through via RGB lighting under the keycaps. I found inspiration in live audio consoles, as they usually have LED lighting above to light up their control surface. So, I found a USB powered magnetic LED light bar online with an on/off switch, to which I thought I could somehow position above the keyboard.
With regards to the actual keyboard materials, I found a cheap Tsangan/HHKB layout and a POM plate from 1UP Keyboards. I decided the keyboard layout to be HHKB, with the additional option to have the Tsangan layout should I want the extra keys. I also wanted to try the HHKB layout, which fit with my retro theme.

I’m an amateur woodworker at best, with limited space, tools, and resources. However, we had some leftover wood from our house projects and I began to dig through our pile. I found some relatively flat and long pieces of wood and began my woodworking journey to design a case that had the following parameters:
- Vintage/retro theme
- HHKB layout
- LED light bar mounted above the keyboard, showcasing SA/MT3 profile keycaps
- Removable top cover for easy transition from Tsangan/HHKB layout
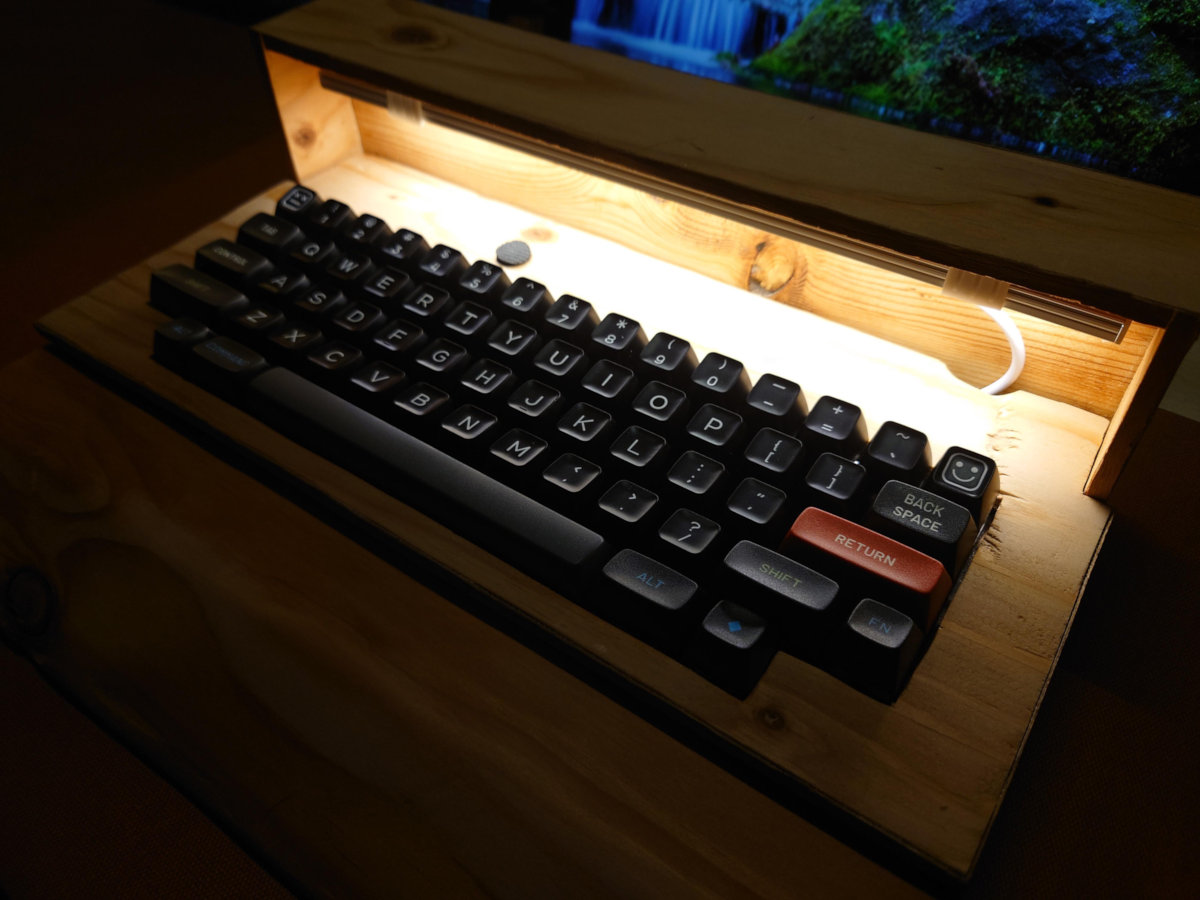
I don’t know the kind of wood I chose, but it was relatively thick, about 1 ¼ inches (or 3.1 cm) tall, so I decided to router a hole to fit the board and make room for sound dampening underneath. I used insulation tape, which is comparable to Kilmat sound deadening material that is used in cars, as well as some layers of black drawer liners. This was useful in removing the hollowness of the wood and also covering the bare wooden surface, as it was somewhat uneven and didn’t look pleasant. I also needed to create a bottom housing where I house the PCB and have space behind the PCB for the USB-C cable and USB cable running from the light bar.

A top cover was needed so that the PCB is secured properly. I had checked Reddit and saw that magnets were a popular choice in custom builds, as they did not interfere with any of the keyboard components, so I ordered some from Amazon and super glued them on the bottom housing as well as the top cover so they would sandwich the PCB in place. After several tries, making sure that the keycaps would be able to move freely without getting stuck on the sides, they eventually connected and it worked!

Since wood-on-wood can cause rattle and other unwanted sounds, I used more of the black drawer liner on under the top cover and created a wooden version of the Force Break Mod, and the liner worked to eliminate the wood touching each other with great success.
I made holes behind the case for the cables to run through and on the right side of the top cover for the light bar cable to run above the keyboard, inside of the makeshift cowl-like cover. I had also made a hole for the power switch for the light bar and used two small traction dots taped together so that the power switch wasn’t bare. I loomed the cables together so it’s easier to run them (a sleeve can also do this) and after applying four traction dots on the bottom case, one on each corner, the project was completed. It’s quite a tall keyboard, so I made an equally tall wrist rest, which traction dots were also applied. I gave them each two coats of teak oil and once they were dry, it was ready to use!
The main hardship I went through was that I don’t have the tools and skills to be able to create a more polished case. It has plenty of “character” and I am not a professional woodworker, so I was fueled more by creativity, problem solving, and the idea of being able to create something unique that hasn’t been seen before in the keyboard community (at least that I’m aware of).
Overall, I am very pleased with how it turned out and it was a rewarding experience.
Specs
- Wooden keyboard case with LED light bar
- 1UP 60% Hotswap PCB – Tsangan/HHKB layout
- Gazzew Boba U4T tactile switches, lubed with Tribosys 3203
- Durock V2 stabilizers, lubed with Krytox 205g0
- Mixture of SA WOB and MT3 Susuwatari keycaps
- Tape mod
- PE Mod
- Foam mod on bottom housing (insulation tape and black drawer liner)

Resources
- More photos on imgur
Published on Sun 11th Feb 2024. Featured in KBD #154 (source).
Related

PCB 68 keyboard
A bluetooth PCB via SuperMini in a wooden case: PCB 68 keyboard by alan0ford.
Wooden custom
This wooden custom by priceT00High keeps growing.
Unnamed monoblock
An unnamed monoblock split keyboard by UmmUhhhShit.
Slide mount wooden case
With minimal experience, eBay scrapwood, popsicle sticks and a hand saw bruh-iunno made his own wooden case.