Keyboard Builders' Digest / Projects
Custom Reform keyboard
Jacqueline designed a custom ergo keyboard for her Reform laptop – based on the Lily layout.

Published April 17, 2022

[Ed.: Jacquelin's (aka @cooljqln) DIY split laptop keyboard, a self-designed replacement version of the open-hardware MNT Reform laptop's stock keyboard, was brought to my attention by fellow Redditor cdc_mkb. (Btw, the MNT Reform keyboard was featured in KBD#59.) I asked the designer for some supplementary info and she was kind enough to write about her project in detail. So let's hear about the inspiration, her background in the hobby, and the whole design and building process in her own words.]
Inspiration
I’ve been really inspired by the MNT Reform as a platform for doing weird things with technology. I know there’s a few different takes on the ‘repairable’ laptop floating around, and there have of course been previous attempts at open hardware laptops. But the Reform has been the first one to really capture me, due to its combination of looking like a real product whilst still being totally open in a hackable way.

By ‘a hackable way’ there, I mean… think about mechanical keyboards. You can just buy an off-the-shelf keyboard, sure. You can also get a DIY kit, or get your own components made using the open source design files, or design your own thing from scratch. It’s 100% down to what you want to do, from an artistic and engineering perspective.
The Reform, to me, offers that kind of complete freedom, but on a complete system scale.
Want a different keyboard layout? Easy, just get a new PCB made! Want to do something weird with the case, like a fun colour, or space for an external antenna? Again, it’s easy! I literally made my own touchpad for this thing based on the design that MNT released (and it works GREAT, too!!)
In my case, because my Reform build is a completely DIY project, I was even able to modify the motherboard to use USB-C PD rather than a DC barrel jack for charging.
Compare this to similar projects that are superficially in the same space – the framework laptop is the most obvious one – and it’s clear that the Reform is just on a completely different level.
I find it all very exciting :)
Background & previous projects
So I, somewhat worryingly, had embarrassingly little electronics knowledge before deciding to build a laptop from scratch.
I’m a Senior Software Engineer at Big Tech Company You’ve Heard Of, so a lot of electronics and firmware stuff has been kind of adjacent to things I work on. But my first real electronics + keyboard building experience was assembling a Lily58 kit myself a few years ago.

It’s very cool actually to look at my old soldering work and think about how long it took, compared to my more recent work!
I’m currently running a little Lily58 group buy for some friends, and so far my record is getting a whole Lily PCB (so half the keyboard) from nothing to fully soldered and tested in just a bit over an hour, with no faults to go back and fix.
Design & building process
The keyboard started off very simply. The Lily58 and Reform keyboards are both designed in KiCad, so I just slapped both PCBs into the same file. Then I used the Lily keyswitch positions as a reference for moving around the reform switches. Then I just deleted the unused keys, and all I had to do was reroute all the traces! (Routing an entire keyboard sucks btw, what a pain!)

Whilst I was there, I also made sure to use footprints that support Kailh sockets. It seemed a waste to commit myself to a single switch for all time.
From there, I had the keyboard PCB made by OSHPark. They’re an interesting fab; fairly expensive compared to the chinese fabs like JLCPCB, but their quality is really extraordinary.

Normally I’d only use them for much smaller PCBs that don’t have a lot of dead space, but in this case I splashed out. That ended up paying off; I did a lot of reflow work fixing mistakes on this board, and I’ve had JLCPCB boards start to fall apart in similar circumstances before.

The PCB arrived, I soldered everything on and got the firmware working, and all seemed well. Then I fit it into the Reform case and discovered an issue: the regular reform keyboard has big holes in the sides! As in… there’s nothing stopping something from falling down into the keyboard, and then off the side onto your actual motherboard, batteries, etc.

With the standard Reform keyboard, they get away with this by having the keycaps sit almost flush with the bezel, so that you can’t even really see down the side. Because my layout wasn’t the same, I didn’t have that luxury.
So from there I fired up Fusion 360 and got to work on some kind of frame design.

I also whipped up a switch plate whilst I was there, since I’d noticed a bit of flex in the middle of the keyboard PCB (it unfortunately has no support in the middle).

After a bunch of iterating, I finally got to the point where I was confident enough to get the design made in CNC aluminium. This was scary and expensive, but I am absolutely floored with how it came out. It could not be more perfect.

Next step in my project is keycaps! I originally used MBK keycaps with hand-drawn dye sub legends. I didn’t like how this looked, or felt! I ended up tracking down the STLs for the early samples of the LDSA keycaps [low-pro DSA, coming soon – Ed.] currently being worked on, and got them printed in MJF PA-10 Nylon. Once they’ve arrived, I’ll be trying out waterslide decals as a neater way of adding legends. Fingers crossed it works out!!
Download
I have a fork in the MNT gitlab instance here: https://source.mnt.re/jacqueline/reform
It includes both my redesigned keyboard, and my motherboard with USB-PD. If folks want to build it themselves then we should chat first though, since there’s a couple of design issues that might be worth fixing!
Published on Sun 17th Apr 2022. Featured in KBD #74.
Related

Make a Keyboard
A handwired project and detailed tutorial on how to design and make a keyboard by berkstone.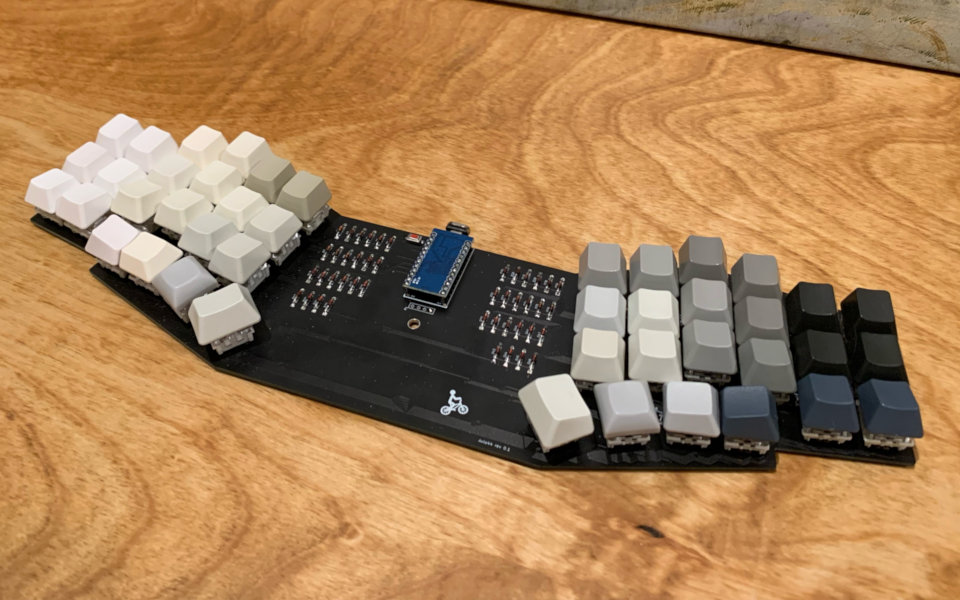
Avlo44
The Avlo44 is a unibody split with exposed diodes designed by u/jrp22.
ChonkV
TheStuChef's 58-key low-pro ChonkV is based on the chocV but features, among other things, a number row.
Saturn
Joshua Chung's Saturn is a pretty sick monoblock split PCB with chunky hotswap controllers via DB25 parallel connectors.
Masonry keyboard
The Masonry by dj_edit is another ergoish columnar keyboard projected on a rectangular keyboard shape.