Keyboard Builders' Digest /
ProtieusKeeb's Keeb Journey
Protieusz, one of this year's most prolific creators, shares his incredible journey from being an outsider to designing PCBs and trackball modules.

Published December 7, 2023
Hello everyone. My alias name is ProtieusKeebs (protieusz, protieus). Let me tell you a little bit about myself. I worked in a hospital IT department with no previous knowledge of electronics, PCB design or any custom keyboard understanding before I ventured into the rabbit hole. My custom mechanical keyboard journey started around April 2022 when I stumbled upon a mechanical keyboard AMSR sound test on YouTube. During that time I was addicted to the thocky sound that the custom keyboard produced. Before that I had never even heard of custom mechanical keyboards.
After a few videos later, I decided to chase after the rabbit, hoping to reproduce the thock sound profile. My very first mechanical keyboard was the Keychron K4, a 96% keyboard with red Gateron G Pro switches. Once I got the K4, I noticed the switches were not hot swappable so I was not able to swap different switches to mod it to have the thock profile. I had modded the K4 with tempest tape mod and added some foam but no thocky sound. Then I proceeded to my 2nd keeb, which was the RK86, but that too didn’t yield the correct sound profile.
At this point I gave up on achieving the thock sound and decided that I wanted to learn soldering and perhaps one day design my own keyboard PCB. I started to order kits from expensive sites since I had no idea what the keyboard community was like. The first discord channel that I joined was the MechWild channel to seek knowledge on how to solder. Then after achieving my first solder build, the BDE Rev 2, I started to chase after 40% unique style custom keebs. Fast forward to Dec 2022, I designed my very first handwired ortho columnar keyboard which I named the BastardDCISO – it has two ISO Enters on the top middle of the keyboard to replace the “T” and “Y” keys. It was a meme and a functional keyboard at the same time, a 5 rows by 11 column ortho that is powered by The Frood with RP2040 MCU.

After designing the BastardDCISO, I proceeded to design and build other generic boring handwired keyboards as practice. None of them are awe inspiring but you can find them in my public files on my GitHub. The real breakthrough of my handwiring keyboard happened when I saw the GRIN keyboard by policium.
My problem with policium's GRIN is that it was all too big and his 40% version was a prototype and had never been released or sold. So I proceeded to challenge myself by using the KLE to rotate the keys to different angles to produce the “smile” or wavey layout. It took a while for me to painfully adjust each keyswitch to the right angles to give the board the distinctive GRIN look. Even though policium did release his regular GRIN 65% KLE on twitter, I could not use it because adjusting the original KLE would mess up the whole positioning. Adjustment of the GRIN 40% KLE design took about a week on and off. From there, the Smile 40 was born.

The Smile 40 is powered by an ATmega MCU and has a Pimoroni trackball on the side. RGB strips were also painfully wire soldered and hot glued to each individual key so they shine. The typing experience was like an eye opener to me. So comfy and much smoother than the regular keyboards, without experiencing any hand pain. However, after designing and handwiring the Smile 40, I was still not satisfied.
The next design of mine that came to mind in a dream was the HiveMind. A 47 keys staggered keyboard with a numpad rotated 45 degrees in the middle. This keyboard was designed for my office use since my job requires lots of number input. This keyboard was still handwired. The HiveMind case was designed in Fusion360 and also my very first time designing using this workflow. At that time, I didn’t know about using offsets nor chamfers so I had to manually trace out the exterior of the case, which took forever and was highly inaccurate. The case ended up looking very squarish but turned out ok.

With the Smile40, the number of the keys was still too many. After some trial and error, the Smile 36 was born. Smile 36, as the name suggests, had 36 keys and was perfect for my use. It was small, compact and comfy like its big brother the Smile 40 and also has a rotary encoder. At this time I also started to learn how to design better aesthetically looking cases after seeing Sadek’s fusion360 case guide. Sadek’s guide was a game changer for me since now I was able to use the offset function without having to manually trace the external outline shape for my keyboard sketch. Hence, the Smile 36 looks much better than my previous pre generated keeb case design.
")
I decided to venture deeper into the rabbit hole by dabbling into PCB design. The first PCB that I chose to design was the Smile36. I watched Noah Kiser’s RP2040 YouTube video and also spoke with a Discord friend named jarv who taught me how to design using EasyEDA which, at least in my opinion, is still the easiest designer tool/app to use as compared to KiCad. Most people say otherwise. For me, the EasyEDA UI was easier to use, there are less shortcuts to remember, and most importantly the LCSC footprints and the part numbers are tied in the library for EasyEDA use. During the first revision design of the Smile36 I didn’t know that the SMD pad footprint was one sided and not dual sided like a thru-hole pad. Hence all my rows didn’t work when JLCPCB printed it. So I had to remediate by doing a bit of handwiring, soldering the rows onto the GPIO pins of an MCU. It was a good learning experience. If you go to my Smile36 Github you will see pictures of the rev 1 hand soldering fix. Later on the Smile36 Rev 8, sponsored by PCBWay, became perfect.
")
After designing my first flagship, I discovered integrated trackball keyboards on Twitter. My first trackball experience was the Cocot46plus. I had to wait a whole month for the GB to ship out. After using the Cocot46plus for a while, I found that the keyboard was still not perfect due to the fact the trackball module is installed on top of the keyboard PCB hence making it very tall for my hands to operate it comfortably. So I decided to buy the Meshi module and handwired it to my next design.
The Meshi module was difficult to purchase since the product was in Japan, available in the Booth store which requires 3rd party proxies and ended up being very expensive. Designing a case using the Meshi module was still difficult for me, and I had to use dxf files from the Ambi GL keyboard to find the right dimensions for the Meshi to fit in my designs. From there on, the Vimana was born. It was my very first trackball design and a very awesome milestone achievement for me. Another hard part of the design was to integrate the QMK source code from Aki27’s Meshi module into my design. With the help of a fellow Discord friend, honorless, we were able to make the code work.
")
")
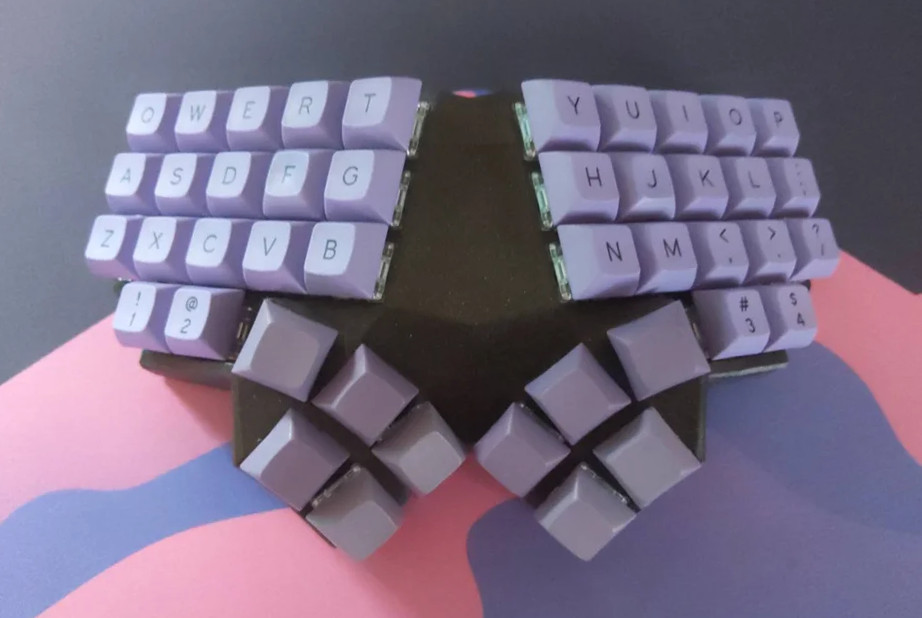
After the Vimana I came up with the idea of designing a Batman theme keyboard by using a better bat logo design which took a long time to get right. This time I learned the skill of using spline for curves in Fusion360 and drew the sketch on one side and used a mirroring function to get the 2nd half to appear accurately, without the need to pull my hairs to manually draw the 2nd half. This was another flagship keeb of mine, the Batarang. I created two layout versions for it: one is the regular staggered layout with an ISO enter key (with the assistance of jade the maid, a Discord friend from the 40s), and the other one was designed by modifying the layout from Reed’s Waxwing. The ISO Batarang is powered by RP2040 PICO USB C version and the column staggered version Batarang was powered by using the Pimoroni’s PGA2040 MCU. Both Batarangs used the 40 mm Cirque trackpads and EC11 encoders as a scroll lock.


Next, I started to focus on more integrated pointing devices in my keyboard designs. The Azoteq 35mm and 65mm trackpads were integrated into my PK-S, ScottyFly’s handwired with a few modifications like a 43mm Azoteq trackpad in the middle and two extra keyswitches for left and right clicks even though Azoteq supports multi gestures.

Moving on from the PK-S, I wanted a larger trackpad design for better comfort, hence the Maximus was born. This keyboard was inspired by the Ieneko42C but with a 65mm Azoteq trackpad instead of the small 43mm trackpad. To my surprise, this Maximus triggered lots of interest among the people in discord and on GitHub. Maximus currently has the highest “star” in my GitHub repo. Designing the Maximus was easy due to the fact by now I have a template case dimension design that I can use from my other designs. Maximus QMK code is borrowed from the Ieneko42C and it worked very well with the PK-S.

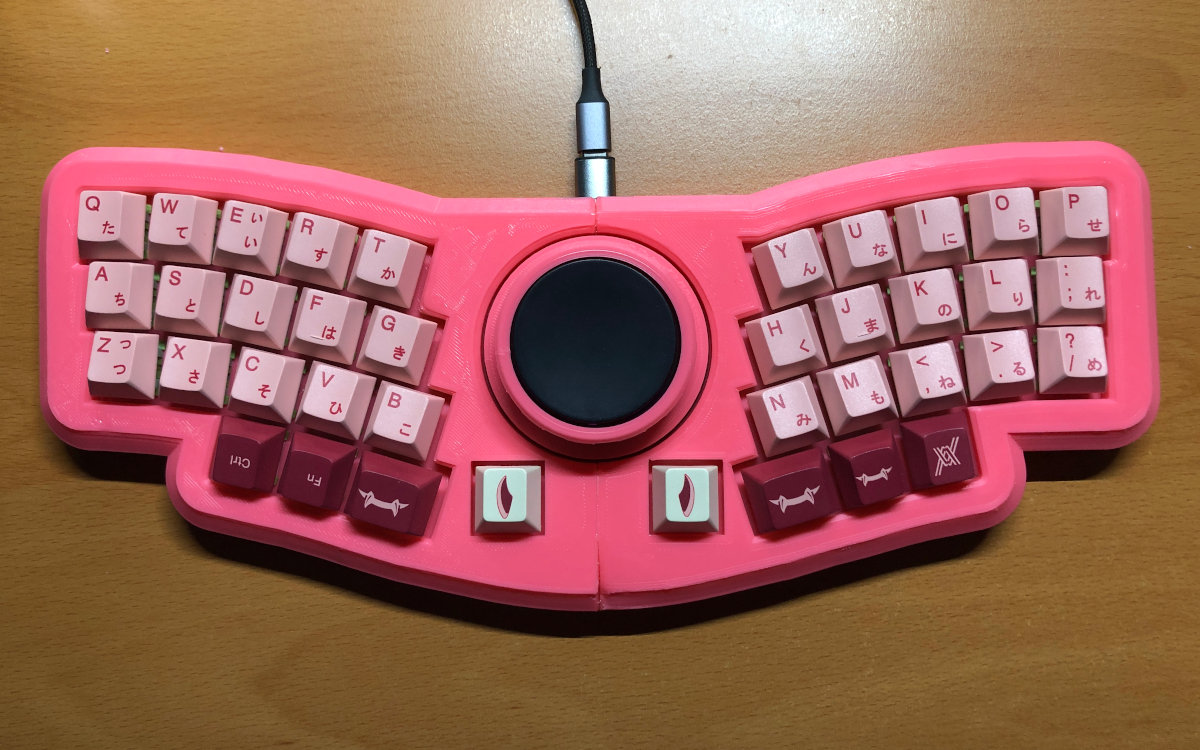
With the accumulated experience and knowledge, I decided I wanted to modify the Quern GRIN keyboard and make it a 40% keyboard. At the moment when I saw it during the beginning of joining the hobby, I immediately fell in love with it but didn't have the knowledge or resources to design it. Now I was able to make the PCB from scratch but had a hard time finding or designing the knob component. So I contacted the designer, policium, and luckily he was happy to share the encoder knob plus the Cirque holder and hence the pink Forever-1 keyboard was born. This keyboard too attracted a lot of attention from Instagram, discord and Twitter. I guess I was able to color match the pink keycaps with the pink case which made it stand out more.

Fast forward to now, a summary of what I have designed so far, which are the following: The DragonFruit, powered by integrated RP2040 with VIK Kiwano trackball module, Starship Bubu-01 prototype, a solo 34mm trackball with 56mm encoder and 5 keys unit, which is powered by my very own all in one MCU with trackball sensor, the OmegaSupreme, inspired by Melon’s Kiwano and jfedor2's PMW3360 and RP2040 module.


I feel that I am nearing the end of my keyboard journey and my two glass shelves are almost full with keyboards. Currently I have two designs in queue. During the time of writing, I have one design that is currently on print by my sponsor (PCBWay), and another design that is also ready to go. If you are curious of what the designs are you can always visit my GitHub to take a look for yourselves since from time to time I have uploaded rendered pictures or partial pictures of my designs. I hope you guys like it, and to the future designers: I hope my designs can inspire you to design more awesome keyboards and make our custom mechanical keyboard hobby to be a common one instead of being a niche hobby. Also an advice for the newcomers in the keeb hobby: Be nice to one another since you don’t know how much time, effort and frustration went into designing a keyboard.

| ProtieusKeebs |
|---|---|
| Location | Richmond, BC |
| Occupation | Hospital IT |
| Joined (the hobby) | 2022 |
| Niche | Handwired, trackpad & trackball keyboards |
| Fav. switch | Any switches, no real preference |
| Fav. keycap profile | SA, MT3 & Cherry |
| Other hobbies | Console gaming |
| Links | GitHub, Instagram, Twitter, Youtube |
Acknowledgements
I would like to give a shout out and thank the following people who helped me on my keyboard journey:
- Tamas for doing a great job to bring all the custom keyboard lovers together via his KDBnews page
- honorless from MechWild who helped so much in QMK coding in the beginning of my keyboard journey.
- jarv from the 40’s, who did a quick tutorial on how to use EasyEDA to design my own keyboard pcbs.
- upset from MechWild, who helped push me to add more features on the Batarang.
- sporkus from the 40’s, who gave me pcb design advice.
- Ffion from the 40’s, who gave me pcb design advice.
- btgrant of MechWild, who helped a lot with QMK coding.
- sadekbaroudi of Fingerpunch, who helped a lot with pointing devices designs.
- Yingeling of Fingerpunch, who gave me lots of encouragement for designing.
- LuTang of the 40’s, who was my first friend in the 40’s when I first joined.
- Hazel of Hazel’s Garage, for tolerating my shitposts and giving me advice on keeb designs.
- NoahK of the 40’s who taught me how to integrate RP2040 onto the keyboard pcbs.
- DrRatsby of DrRatsby’s Rat’s Nest, who inspired me to design my own keyboard and also gave good advice on designing.
- noelle emilia dee and sumandrew of the 40’s, who gave me advice on Fusion360 designing.
Plus anyone else whom I forgot to mention, thank you so much for being a united keyboard community.
Published on Thu 7th Dec 2023. Featured in KBD #2023.
Related

Cat-shaped keyboard
A cat-shaped design by cashmeerkat77 for inspiration (with gallery).
Quetzal
KeyboardDweebs' open-source Quetzal is not the usual 100% keyboard you'd expect.
Unnamed 65
The semi-handwired Unnamed 65 by icelongclaw features Amoeba PCBs and has a public KLE layout.
Torch0
A 3D-printed handwired monoblock split by 70rch: torch0.
ffkb with led ring
Sadek Baroudi is having fun with led rings, this time on his ffkb.