Keyboard Builders' Digest / Projects
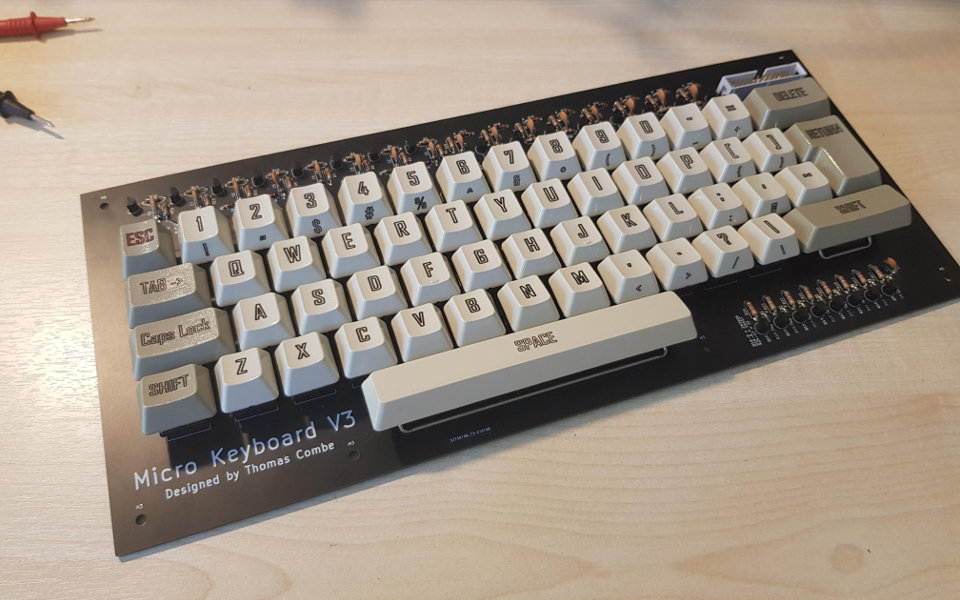
Micro Keyboard V3
Thomas Combe writes about his keyboard built for a 8-bit computer. Without a microcontroller.

Published September 20, 2021
I’m not really a keyboard guy to be honest. My hobby is making cool things with electronics and one of the things I’ve been making recently is an 8-bit computer.
On contemporary 8-bit computers
It may surprise you but the 8-bit processors in the computers that you remember from the 80s are still being produced and for many electronics nerds, building little computers with these outdated chips has become a bit of a hobby. The usual goal of these projects is just to get the computer talking to a serial terminal on your laptop, which is no mean feat, but there’s something missing from these projects….and that thing is a great mechanical keyboard!
Many early home computers were famous or infamous for their keyboards. You saw everything from the spectrums awful rubber keyboard to the legendary IBM model M keyboard that’s still regarded as one of the best keyboards ever made. Clearly making a custom keyboard was the way to go for a proper 8-bit computer project.
Layout
So the first thing I did was decide what letters and characters I actually needed. Remember, this is a very simple computer, it obviously isn’t running windows so it doesn’t need a windows button, neither does it really need function keys, alt, page up/down etc. All it really needed was the numbers, letters, punctuation and a few symbols. I eventually narrowed it down to 54 essential keys.
Next I decided on a layout. I pretty much just laid them out as you’d find on a regular QWERTY keyboard minus the keys I’d removed and shuffled some of the key size around (notably making the left shift key only one wide, shifting the bottom row to the left).
A matrix without a microcontroller
Then I designed the circuit. Keys on a keyboard are arranged as a grid of rows and columns (matrix). Each key has a corresponding row and column. The main problem with this was that cherry MX key switches only make one connection when they’re closed, not two, meaning it’s not straightforward to activate a row and a column.
Modern keyboards have a dedicated microcontroller in the keyboard that uses a little bit of trickery to detect the row and the column called strobing. I didn’t have want to put a microcontroller in my keyboard and this left me with a problem, I’d either have to devote a lot of the processors time to scanning the keyboard regularly or I’d have to come up with some other trick.
So I did what anyone would do. I googled it and found a post on hackaday which used a clever bit of analog circuitry to solve this problem. I then stole this circuit and whipped up a circuit board for my custom keyboard using cherry MX blues for maximum clickiness!
Analog rollover
The board worked just as expected but after messing around with it for a while I discovered one problem. This little circuit I’d stolen didn’t work when multiple keys were pressed. When more than one key was pressed then the keyboard would send out all kinds of invalid codes. I found that the problem was to do with the circuit’s analog nature.
As opposed to digital (that represents things as 0s or 1s), analog represents things as a range of voltages. The problem was pressing more than one key would push the voltage into a range that the digital electronics didn’t see as 1 or 0, causing lots of problems. After a bit of head scratching, I realised that this could be solved by swapping a few resistors with diodes, which drop a fixed amount of voltage over them as opposed to the variable amount over a resistor.
Redesigning the board to use this improved circuit I had a second revision circuit board manufactured in matte black! I soldered it up and it worked perfectly.
Keycap legends
Now it was time to sort out the keycaps. I’d bought a set of light and dark grey keycaps, that look a lot like the keys on the IBM model M keyboard mentioned earlier. The only problem was that they were completely blank. I’d have to apply the letters myself. I figured that I could apply them by using transfer paper. It’s the same way you print things on to t-shirts.
You print onto the paper and apply them to the keycap with an iron. The problem with this was that the heat would melt the plastic key caps, no matter how briefly I touched them against the iron. After melting about half a dozen keys, I realised that clearly this method wasn’t going to work.
Next I tried using decal paper, which transfers the decal to the key when it gets wet. This technique worked well but had one flaw. It’s not very durable. After a while the letters will start to peel off. To solve this I applied a layer of clear varnish over each of the keys. Then I popped them all onto their switches and the keyboard was finally finished!
Summary
Now I have a nice classic looking mechanical keyboard to plug in to my 8-bit computer. Have a look at my imgur post to check out things like the prototype, the keycaps and the final keyboard in more detail.
Published on Mon 20th Sep 2021. Featured in KBD #44 (source).
Related

Keltron keyboard
u/KingD421 found this vintage Keltron, part of a fire alarm system.
Entertainment Computer System
A rare find posted by Dubis7.
HP 264X keyboard
A mouthwatering HP 264X keyboard from 1974 reviewed by Chyrosran22.
Focus FK-5001
Focus FK-5001 with built-in calculator and other curiosities acquired by DrHERO1.