Keyboard Builders' Digest /
Anymak - the compatible ergonomic keyboard layout
In part two of his series about increasing typing comfort, Peter introduces Anymak, the next step in balancing layout compatibility and ergonomics.

Published January 22, 2025

Do you want to enhance your keyboard comfort, ergonomics, and efficiency? Need the ability to effortlessly switch between a standard laptop keyboard and a split columnar stagger keyboard? Looking to use your preferred alphanumeric layout, whether it's QWERTY, Colemak, or a fully optimized design? After the introductory part one of this series, discover Anymak – a fresh take on keyboard layouts!
Intro
Anymak is a keyboard layout approach designed to largely enhance typing comfort. By rearranging keys, and utilizing one-shot modifiers and bottom-row mods, Anymak makes it easier to access common keys like Shift, symbols and navigation shortcuts, while minimizing finger stretching. It maintains consistent key positions across both standard and ergonomic split keyboards. As a versatile keymap approach, Anymak is compatible with various layouts, allowing you to continue using QWERTY, Colemak, or any other layout you prefer. I myself use the Anymak concept with a fully optimized multi-language character layout, specifically designed for English, German, Dutch, and other European languages. It is named END and is probably the last layout you will ever need. END will be introduced in the third and final part of this article series.
TL;DR
Most alternative keyboard layouts or layer schemes suffer from the following downsides:
- they require a specific key arrangement, often a certain number of thumb keys
- switching between a split ergo keyboard and a laptop forces the use of different finger positions
- new alphanumeric layouts often overlook the positioning of the Shift key and the integration of an additional symbol layer
- timed methods, such as auto-shift, disrupt typing flow and slow the user down
Anymak overcomes all these disadvantages with minor adjustments to your alphanumeric layout. The most significant change is the B-key position (on a standard keyboard) not being used any longer.
If you prefer not to modify your alphanumeric layout at all, you can use a light version called Spacemak. This offers the same full navigation layer by employing the SpaceFN concept. In addition it utilizes the CapsLock key featuring a right-hand only symbol layer. Jump to the end of this article if you are interested in this alternative.
The following graphic illustrates the Anymak concept.

In addition to the base layer, Anymak includes a Shift layer and an additional symbols layer, both of which are accessed using dedicated one-shot keys. That means you do not need to keep the layer-key held down. This makes typing less error-prone and also more comfortable and potentially a bit faster. The layer keys for shift-characters and for symbols are symmetric on the left and right hand and are easy to reach. Shift can be combined with bottom-row-mods for Win (OS), Alt and Ctrl. In case you have tried home-row mods without success, you still might give this option a chance. In my experience it works without the timing-problems you might have with home-row-mods. Finally, the space-key is in the standard position, but doubles as a layer-switch to access the navigation and shortcut layer.
In the following, you will learn why Anymak is set up in this way. One important aspect is how Anymak allows to use a standard keyboard almost as ergonomic as a split, columnar-staggered ergo keyboard. To complete the Anymak-story, I will also provide you with some tips and pointers on how to create your own custom Anymak version. Of course, you can base your version on an existing variant. I envision that finally a whole family with anymak:QWERTY, anymak:QWERTZ, anymak:COLEMAK, anymak:GRAPHITE and more will be created. Especially for German or Dutch speaking people my anymak:END layout might be a good fit as well.
Finding the best compatible key arrangement
But now let's get our hands dirty. This video provides a clear and concise introduction to how the key arrangement and keyboard layout can be optimized. As most readers are surely being aware, the standard row-stagger keyboard is not optimized from an ergonomic point of view – although by chance the right hand side works surprisingly well. By mirroring the right side and small adjustment off the key-offset on the bottom row a fully symmetrical keyboard can be created. The Tsuka60 is a great example of how to transform a standard key arrangement into a highly ergonomic version. Unfortunately there is no wide-spread adoption of this idea in sight. Another approach is to arrange the keys in an ortholinear grid or with a columnar offset or combine that with a key well. That is also a good approach, but will require a split or unibody keyboard to angle the keys matching to the arm and hand angle. Finally, when you are open to really new approaches, the Mantis with hexagonal keys or the Svalboard are very interesting options as well. In this article, however, I want to focus on columnar staggered keyboards because they can be used in a way that maintains full compatibility with a standard row-staggered keyboard.
For convenience I will use the following names:
- split columnar staggered keyboard: "ergo keyboard"
- standard row-staggered keyboard: "standard keyboard"
Comfortable key positions
Let us start with the ergo keyboard. We will transfer our findings to a standard keyboard later. When deciding which key positions are comfortable to reach and how many keys to use, personal preferences come into play. They are also influenced by your individual hand size and the position where you place the keyboard on the table. Even when the key weighting different people might give for a specific key arrangement are not the same, there is still some consensus: favoring the home-row, not giving too much load on the pinky or using the thumb more, is a good idea. I will explain why I think a 4x6 +1 layout can be the sweet spot for many people. In case you favor 3x5 and two or three thumb keys, do not stop reading. You might still benefit from the following thoughts.
Just to make the graphic easier to interpret I plot the keys on a grid. In actual use, most people will likely prefer a columnar staggered version with varying amount of stagger (I will touch on that in at the end, when describing my keyboard specs). In the following graphic the home-row-position is color coded in lighter colors.

For typing I suggest to only use the key positions in the graphic above. The aim is is to have all frequently used ones very easy to reach. But also to have enough keys to realize a symbol and navigation layer. For non-english speaking people it is also crucial to have easy access to their local characters.
I do not suggest that a keyboard should only have the keys you see in the graph. Actually I think it is very beneficial to have more keys. A number row, or a few extra keys where you can assign media functions (volume) or often used functions to can be very beneficial. But I suggest to only use the keys shown above for typing, standard layer switching and regularly used shortcuts (copy, paste…).
Thumb — Using one main thumb key (per side) is preferable in my opinion. There are two important reasons. First I want to make sure that the same key arrangement can be used on a standard keyboard. Because a standard keyboard only has a single wide space-bar I decided to restrict to use only one main thumb key (per side) on an ergo keyboard as well. Second and as important: Most ergo keyboards use just 1u wide thumb key for all thumb keys. In my experience it can be better to use a 1.5u or 1.75u wide main thumb key. Extra thumb keys to the left and right might be smaller. But the main thumb key being wider improves the typing experience. That always allows to you just press the thumb key where your thumb naturally falls. Also when moving the hand a bit during typing. A wide thumb key makes it more comfortable to reach from any position. That also includes different angles at which you might set up your keyboard. Last not least it takes into account for different hand sizes. A one-size keyboard will be a better fit overall for different people! In addition, the thumb has a different motion range compared to the other fingers. You tend to be less precise with it. And you also do not want to overuse the thumb. Some people have experienced thumb or hand pain when trying to use the thumb "too much".
Pinky — Note that the outer bottom key on the pinky, is not used at all. Just try for yourself which keys are easy to reach with the pinky. You will find that this key requires quite uncomfortable hand-contortions, or a large movement of the hand — away from the home-row position. This is the location where the Shift-key on a standard keyboard would be (ANSI-keyboard: right side and ISO-keyboard: both sides). It was a heureka-moment for me, when I realized that to have the same fingering on an ergo and standard keyboard, I should get rid of the normal position of the Shift-key (and also need to let go the B-key)!
On the outer home row and top row the pinky can be used comfortably. When I started to use the CapsLock-key (position) as a layer switch (see first article) it felt unnatural for a few days. But that was just because I was not used to use that finger movement. On the right hand I never had a problem with the symmetric key ('-key on a QWERTY and ä-key on QWERTZ layout). Look at the outer column keys in the graphic above, which are shown color coded in brown. Those 4 extra keys (two on each side) you get on a 6-column ergo should not be omitted in my opinion. They are also available on a standard keyboard. These keys are very valuable, because they are about as easy to use like the inner index keys.
Number row — The number row could be omitted (not shown in the graphic above). But in my experience a number row is useful to have. Yes, the fingers need to be extended to get there, and depending on your hand size, maybe even the hand needs to be moved a little bit. But they are still fairly easy to reach and I feel it is worth to have a number row therefore. I have been typing with the number row for "forever" and basically have the same speed and accuracy as on other keys. I know some prefer to pack the numbers and symbols from there into an extra layer. That is surely possible. It is a matter of preference. When typing a few numbers mixed with text, a dedicated number row speeds up typing quite a bit. On the other hand one can also add an extra number layer, for example when you do a lot of number crunching, in Excel for example. Luckily you do not have to give up a number-row or a number-layer. Just choose one or even both — whatever best fits to your needs. I personally use the number row but might set-up a number-layer in the future, in case I will need to do number-heavy work.
Ergo keyboard ⟺ Standard keyboard
We found out which keys are comfortable to reach and based on that decided which ones we want to use. Now let us see how we can translate this key arrangement on the ergo keyboard to a standard keyboard.

The animation shows that most keys on a standard keyboard are available on an ergo keyboard. But you will lose 5 keys in the upper corners. Because those keys are not in easy to reach positions, we do not really miss them. ;-) We will find a better place for those functions, including Enter and Backspace.
The key labels in the graphic show the default QWERTY position. This is just for convenience, so I can reference them. But we will later decide, which characters or function we actually want to put on each key. We are now only concentrating on the key arrangement as such and which finger to use for which key. Note that the animation above shows traditional fingering, where for example the c-key is typed with the middle finger. The following graphic illustrates the traditional fingering.

You note that the right hand is angled to match the direction of the stagger, while the left hand side is not. This is really bad. Many people have therefore developed a habit to type some keys on the left side with different fingers than traditionally taught. We want to have the left and right hand side to be symmetric. On a standard keyboard we will use the so-called angle-mod finger placement. Here the left bottom row is symmetric to the right side.

Due the row stagger being only 0.25u on the top row it is not possible to use the left top row also in a symmetric way compared to the right side. This is the remaining problem zone on a standard keyboard, which we can not improve. But I found it is still the best fingering to use and not too bad, compared to an ergo keyboard.
On an ANSI-keyboard the left Shift-key is easy to reach. But you see that the right shift-key is not. When we want to use the comfortable to used reach keys, like we explained above, you see that the right shift key has no finger assigned to it. Also note, that the B-key has no finger assigned to it, when we use the angle-mod fingering.
Side note: For those using an ISO-keyboard the principle shown is the same. There is just an extra key on the left, due the smaller shift-key there. For this explanation this does not make a difference.
Let us now convert an angle-mod standard keyboard to an ergo keyboard:

Interestingly, the B-key, which did not had a finger assigned to it, is a key we lose it in this transition! Do we mind? What do you think!? When you look at all keys in the main block on a standard keyboard you will notice that the B-key is the one which has the longest distance from the home-row position. On a standard keyboard the B-key is indeed the key, which is the hardest to reach. Of course not talking about Enter, Backspace or the arrow-keys in the navigation block. We got rid of those already, because they are literally a stretch. ;-) So no, we do not mind loosing the B-key. BTW, when you look again you see that we did not really lose the B-key, but a new key appears now on the bottom left side. You remember. That is the bottom corner key we decided not to use for typing texts, because being cumbersome to reach!
The Anymak layout
But wait? Wasn't the goal to have a key arrangement comfortable and also compatible with any alphanumeric layout? Yes, that would be the holy grail. But as you see we either have to give up comfort or some compatibility.
The price to pay for comfort
We have to pay four (or five) small fees to win a real comfortable fingering on a standard keyboard, which we can use in exactly the same way on an ergo keyboard. Let us discuss what we lose, what we gain and how we can recover from our "loss".
- The B-key is "lost" in that sense that it moves from the bad standard position to another place where we also do not want to use it. The solution is to assign the B-key to a new place. My suggestion for QWERTY is to assign B to the ;-key position on the home-row. In that way you will only have to relearn one single character-key. The ;-character will find a new place on the symbol layer to be introduced.
- We will give up the /-key to have the right Shift-key symmetric to the left side. / will also find a new home on the symbol layer.
- We will also let go the '-key and CapsLock key. Those will be used to get to our symbol layer.
- Those using an ISO-layout will also lose an additional key. Left Shift will be moved one position inwards to be symmetrical to the right side.
- Space-held cannot be used directly for repeated space-character output.
Anymak wins comfort
By re-assigning 3 (or 4) keys and using space-held as a layer switch we win the following:
- Only comfortable to reach keys are used.
- Exactly the same fingering on an ergo and standard keyboard.
- The Shift and a symbol layer are both easy to access and left and right hand layer keys are symmetrical.
- To type characters and symbols no held layer keys are needed, because both shift characters and extra symbols are typed with one-shot modifiers. This is a huge win in comfort and makes it easier to get faster and is also less error-prone than holding down a key to access a character or symbol layer. In case you need to type a few capitals in a row you can of course still keep the shift key held down. Or if your keyboard or software has the option you can assign a key to CapsWord.
- Using bottom-row-mods (lower-row-mods) we will not need to have extra keys for Ctrl, Alt or Win (OS). And important: Bottom-row-mods are on keys which are used far less frequently than the home-row or upper row. Therefore they are much less likely to interfere with normal typing. One important reason for this is that Shift is a dedicated key and not realized as a home/ bottom-row-mod. Advanced algorithms to detect if a key is to be meant as a character or modifier can be applied, but in my practice have been shown not to be needed. Last not least, because Shift is in the same row, any key combos with multiple keys, such as Shift-Ctrl or "Hyper" (Shift-Win-Alt-Ctrl) can be used easily as well.
- Using the SpaceFn-concept — holding space to access our navigation layer — we can use the left or right thumb and access the needed functions with the other hand. So that is always comfortable. In addition it is possible to use one-handed shortcuts on occasion, for example when using the mouse with the other hand. In general I recommend to use the opposing hand although.
In contrast to typing text quickly, editing or navigation does not need the super-fast one-shot actions. Also the thumb lends itself much better than any other finger, to be used for two-finger combo's. It is not cumbersome or hindering to keep space held down with the thumb. Anymak does not require any combo's for typing. That is a huge advantage and in contrast to a standard layout and even most alternative layouts, which typically require to keep the shift or AltGr-key held.
anymak:QWERTY, anymak:COLEMAK, anymak:YOURLAYOUT …

For Anymak to work you will need to slightly adapt your alphanumeric layout like outlined above. I have not prepared a layout suggestion for the different alphanumeric layouts, because I use anymak:END myself. But I invite you to suggest on Github which Anymak-layout might work best with QWERTY, QWERTZ, Colemak, Dvorak or other layouts. I offer to help with the implementation and host the results there.
Following some general thoughts what to consider when you set up your Anymak variant. I use QWERTY as an example, but that can be applied to any alphanumeric layout of course.
anymak:QWERTY — an example
For QWERTY the B-character can move to the ;-key-position on the home-row. The aim is here to make as little changes as possible. Otherwise you might want to look at a fully optimized alphanumeric layout. The ; and : characters can get a place on the newly created symbol layer. On that layer I would also put those symbols or selected Greek characters (μ…) you will need regularly. For QWERTY users you possibly will have more keys for symbols than needed. You can decide to use one half for symbols and the other half for a mouse or number layer for example. Or when you do not need those you can omit the right symbol layer key and just assign the key on the left side (CapsLock-position) as a layer switch. Then you do not need to assign the ' character (or ä for Germans) to a new position.
In case you do use a layer-key on both sides, you can even assign characters to the layer-keys (symbol layer and shift-layer) to double their functionality. In that case you should use the opposing layer-key to get into the one-shot layer. The next keypress on the relevant layer-key will then trigger the assigned character. To restore the functionality of repeated space-keys (when held) the symbol layer should include space. When I explain my complete anymak:END layers in the next article you will see examples what is possible.
The Anymak-navigation layer — an example
In this article I want to already introduce my navigation, shortcut and editing layer. The navigation layer is independent from the alphanumeric layout, so the example can be an inspiration for anyone. The navigation layer tries to be easy to remember, for quicker learning. But when I was deciding for a key-position the frequency of the key and ease of reach was the deciding factor. For example I think the Enter-key deserves the best possible position. So I put Enter on the right top row middle finger. From a logical standpoint I would put PageUp there, to be similar to the arrow-keys on the home-row. But you quickly adapt and learn any key position. The importance and frequency a key is used is therefore of higher importance than the ease of learning. The navigation layer suggested below has proven to work very well in more than 2 years practice. :-)

The key-labels of most keys should be self-explaining. A few possibly need a bit of explanation: The "Everything"-key is a system wide search program I use very often. Deleting the previous word got a dedicated key, so I do not need to use the combo Ctrl-Backspace (with held space). For other shortcuts, like 'delete to the begin or end of the line' I use the relevant key-combos. They are also easy to reach, but because deleting the previous word is especially common I felt the dedicated key worth it.
The Undo- and Redo-key have proven to be especially useful as well. For arrow-keys I use the positions which are also used in VIM and some Linux programs. You can of course also choose an inverted T-layout if you prefer that. Copy, Paste and Cut got a prime position, like also Alt-Tab, because they are used so frequently. The paste-key has a trick under its sleave. When I hold the paste-key it will launch my clipboard manager Clipangel to paste from the history. Finally I also have the F-keys on the navigation-layer. You notice that the left hand side goes from F1 to F6. The F-keys are placed on the same position like the relevant number-keys.
Number-Row — standard or symmetrical?
When you implement a number row you have the choice. Do you want to have the numbers on the same finger like on a standard layout like QWERTY? Or do you want to have the numbers distributed evenly on the left and right side? The latter is often chosen for ergo keyboards. It makes sense, because the 1 is easier to reach then. I decided to keep the numbers in the standard position. Benefit is that I can continue to use the same fingers, like I did for all the years. I felt the easier to reach 1 is not worth to need to retrain myself. The second benefit is that the legends on the keycaps on a standard keyboard will match the number output. And finally another advantage is that the -key (minus-key) stays next to the =/+ key which is often used to zoom in and out. So the reverse zoom functions stay together. For most people it typically is not worth optimizing the order in the number row. But when you want to do so, you may read Optimizing the Number Row.
Spacemak - the 99 % compatible alternative to Anymak
When you do not want to make the needed changes to your alphanumeric layout, you still can hugely benefit from most of the features Anymak has by using the following layout. Here an example for QWERTY.

In contrast to Anymak you will continue to use key-combo's — means holding layer keys — not only for the navigation layer, but also for the shift and symbol layer. You miss dedicated keys for one-shot layers and will enot benefit from the relevant advantages. On an ergo-board you will use the z- and /-key held to enter the shift-layer. The chances for typing errors increases, but it is still a viable approach some might like. You can also decide to keep the standard position of the shift-keys in the bottom corner alternatively. But this is a significant loss in comfort in my opinion. For ergo-only keyboard users a dedicated thumb-key can be an option as well.
When you decide to go for Spacemak there is another disadvantage which possibly is not directly visible. You will also lose the ability to use the same finger positions on an ergo and standard keyboard. But when you only use one or the other, maybe this restriction is not relevant to you?
In the same manner like for the anymak:YOURLAYOUT family I did not create a Kanata example file for spacemak, but plan to do so when I find some time. You will find that on my Spacemak Github page then. You are invited to beat me and suggest a Kanata file quicker than I come around to do so. :-)
Keyboard specs — why the Lily58 is great for Anymak
This article was typed on my Lily58. The Lily58 has a moderate pinky stagger. Some people prefer a stronger pinky stagger. But when using the Anymak layer concept you will want to have the Shift key very easy accessible. With a not too large pinky stagger the bottom row is very easy to reach with the pinky — easier than with a more pronounced pinky stagger. A not too large pinky stagger likely also eases switching back and forth between a laptop and an ergo keyboard. When deciding for a keyboard should not believe the marketing hype that a specific key-arrangement would require less distance to reach the keys. When one key is closer to a finger the key next to it will be automatically further away. So it is always a trade-off. That includes the amount of pinky stagger. What is best for you will depend on your hand size, but also on the layout you use.
One change I made to my Lily58 is to use a 1.75u wide thumb-key. This has proven to be very useful. I lose one of the thumb-keys by doing so, but find the trade-off worthwhile. My dream keyboard would be close to the Lily58 key arrangement, but offer extra keys in the thumb-row. I use them for additional functions, like for example Mute. But also for left/right-arrow for left-handed scrolling, when using the mouse with the other hand.
Author data
| Peter Paul |
|---|---|
| Handle | rpnfan |
| Location | as a German living in the Netherlands between Gouda and Rotterdam |
| Description | somehow I became a "keyboard freak" over the years, probably spending too much time on finding the perfect keyboard configuration ;-) |
| Joined (the hobby) | around 2000, developing my alphanumeric layouts since 2022 |
| Niche | keyboard tricks for me and possibly you? |
| Fav. switch | Kailh Deep Sea Silent Pro Box: Tactile Whale (alpha-keys) and Linear Islet (mod and shift-keys) |
| Fav. keycap profile | OEM / Cherry, but searching for the perfect sculpted profile (current contenders I would like to try: CLP, DES…) |
| Other hobbies | music, DIY-loudspeakers, riding bicycle and a bit of woodworking |
| Links | github.com/rpnfan, youtube, keyboard.hashnode.dev |
Published on Wed 22nd Jan 2025. Featured in KBD #184.
Related

Connected: A tale of obsession over cables
David discusses why he started Kool Keys, and what making high end cables entails: the costs, equipment, trials and tribulations of being obsessed with making the perfect cable.
END - my final keyboard layout
Peter wanted to find "the best" alphanumeric layout for English, German and more European languages – and ended up with anymak:END.
Closing down Pikatea - A Farewell
Jack and Bethany discuss their company history as they close Pikatea, their 5+ year keyboard and macropad store.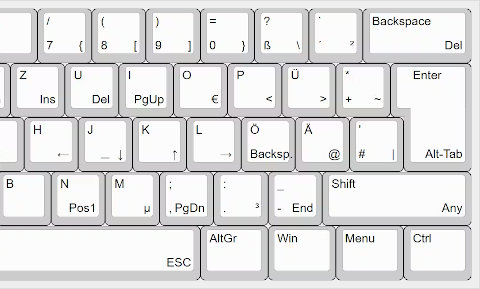
A (r)evolutionary approach to improve on the standard keyboard layout
Since the year 2000, Peter has been on a quest to improve his typing comfort. In this three-part article series, you will discover three distinct solutions that balance layout compatibility with ergonomics.