Keyboard Builders' Digest /
CLP – How I found my keycaps
This is the story of CLP – Contoured Low-Profile Keycaps –, vvhg's personal project born out of admiration for existing designs and the pursuit of a typing experience that feels just right.

Published December 14, 2023
How it all began
Whether you're a seasoned keyboard enthusiast or – wait, who else would read this? – you've likely experienced the love-hate relationship with keycaps. In my case, the journey began with designing my own keyboard, the fisk. That was back in 2021.
We're all mad here – A Journey Down the Rabbit Hole or "How I Found My Keycaps"
The fisk isn't your average keyboard; it's a reflection of my wish to not only have great ergonomics and functionality but go a step further and try to leverage the unusual form factor of split keyboards in the case design.

I let others be the judge of the design but I dare say it is a little different – that demanded keycaps as unique as the board itself. When I came across the Gabriele 9009 keycaps, their stylish and sleek design immediately caught my attention.
Beautiful but strange: The Gabriele 9009 keycaps
After immersing myself in the world of keyboard customization and experiencing the elegance of the Gabriele 9009 keycaps, I found myself at a crossroads. The visual harmony they brought to the fisk was undeniable. Yet, as with many love affairs, challenges surfaced.

The Gabriele 9009 keycaps are a quirky choice in the realm of custom keyboards, and they definitely march to their own beat. A true vintage found only on the Gabriele 9009 and SE 310 electric typewriters, they are low profile dark brown (there is a blue on light grey version too) ABS keycaps with off white legends (the backspace is red!).
While they boast exceptional quality, including a thick double-shot construction, precise legends, and a comfortable cup design that provides immediate feedback with even slightly off-center keypresses, and they have these slanted keycaps, just perfect for the thumb keys! – their unique design comes with its challenges.

Their stand out feature, the unique shape with the pronounced cups, although providing immediate feedback, can be a double-edged sword.
The precise haptic feedback when off even by a millimeter is great…but when you are off just a hair more, feedback turns from Dr Jekyll to Mr Hide. Suddenly the feedback gets completely confusing and uncomfortable – you get totally lost!
These pieces of keyboard (well, typewriter actually) history would be great for two kinds of people I guess:
- people typing with sniper precision
- collectors focusing on aesthetics and uniqueness before everyday typing efficiency
These keycaps are special, and they have their place but that place is not on my daily driver. As much as I love their looks, the demanding precision of the Gabriele keycaps left me fatigued and at times frustrated.
The search for comfort
I was searching for something more tailored to my typing style – I don't lift my fingers too much and rather slide from keycap to keycap.
The Pseudoku keycaps, with their promises of comfort seemed like a good fit and kept dancing in my mind. The elevated height, however did neither optically fit the fisk nor made sense in a design where I tried to shave off every millimeter of height where possible. Simultaneously, I envied the choc crowd for their low-profile keycaps, especially the KLP-Lamé by braindefender.
When the MX version of those keycaps released, I was very excited as they clearly were the best fitting option by far.
The birth of CLP keycaps
The need for a 1.5u keycap for my thumb on the fisk – I wasn't going to change the design of my keyboard just because there was no 1.5u keycap --- was a problem. The appeal of the KLP-Lamé was undeniable. So why not just design a 1.5u keycap? I quickly installed Fusion360 and went at it, the 1.5u keycap was added in no time. That could have been a pull request and all would have been done and dusted.
Well – of course it didn't stop there …

I decided that I wanted to pull down the skirt a bit more to hide the switches. This was just personal taste, I do not want to see the switches below the keycaps and prefer a more "closed" look. I don't know if the higher skirt is an advantage with RGB but as the fisk doesn't have RGB and I don't care for RGB I went with lower skirts.
I also added 7deg tilted versions.
I quickly ordered some test prints at an online printing service. As I already had my fisk printed in SLS and liked the print quality, I ordered the test prints in SLS and resin. This way I could compare them and decide what I like better later.
Talking about print quality, the test prints were encouraging. Interesting and somewhat unexpected was the comparison between resin and SLS.

The resin keycaps looked just like injection molded and are really smooth – but they are "sticky" I just can't slide around, almost a feeling comparable to this rubber coating you can find on some mice. It does seem to get better with usage but I really don't like it.
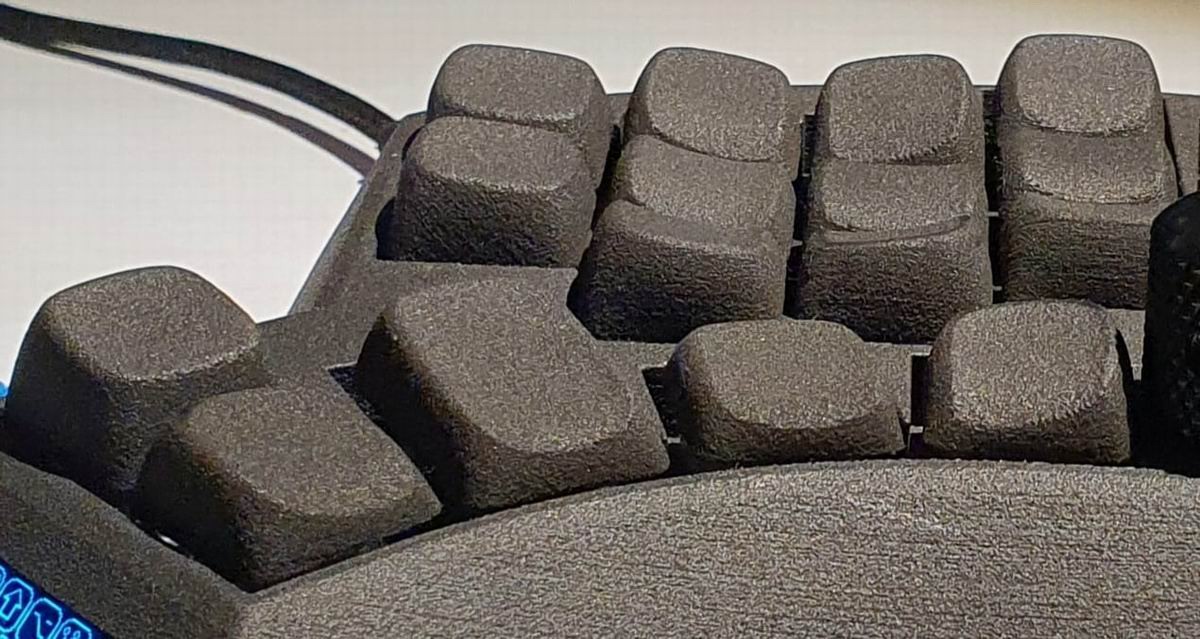
The SLS Nylon have the typical rough SLS texture and are arguably not as pretty – the feel however is just phenomenal. They have a nice haptic feedback from the texture and they are really skiddy. You never get caught and don't really have to lift your fingers, you can just slide around.

But of course the test prints had some issues, some I know they had – the SLS ones even had holes due to a thin spot! – some I discovered when I installed them and typed on them and looked at them a bit closer. The skirts were still not low enough for my taste and the transitions between some keycaps weren't particularly smooth either.
Spiraling out of control
So back to the drawing board (well that was a parallel process tbh). From there things got messy – I basically changed nearly everything, no stone was left unturned.
I changed the design even more, made them more rectangular at the base and pulled the skirt down even further. I changed the curves of the top on most if not all of them, not dramatically in some cases but it turns out that even as little as 0.3 mm can make a clearly noticeable difference!

And why not try to add a few shapes that transition nicely into each other – a continuation of the saddle for the home row and its smooth transition to the upper and lower row. Should the same not apply to the inner index finger columns? And why stop there? So I added a whole bunch of special keycaps for special positions. With all these profiles it should be possible to cover many (quite literally) edge cases on ergo keyboards.
The name kind of gives it away "contoured" was really at the core of the design process, sliding not only from home up and down but also to the side or to the corners where e.g. "t" on qwerty (yuck) would be. So this quickly spiraled out of control and resulted in 19 different keycaps (I even included some R4 ones for the numrow fraction, although they are pretty high for low profile keycaps.).
Standing on the shoulders of giants
When I messaged Tamas to tip him off about my keycaps (rather early in the process), the journey took an exciting turn as he connected me with braindefender, the creator of the fabulous KLP-Lamé keycaps! With his expertise, keen eye for design, and willingness to contribute, he went above and beyond – he spotted errors in the design, offered valuable feedback/suggestions/tips, questioned design choices, suggested to add some (even) more shapes to tie everything together – the list goes on.
But he didn't stop there, he also did test prints, saving a bunch of time on iterations and printing service cost (yes, I was crazy enough to design keycaps without owning a 3D printer). All this helped a great deal to get these to a quality I am more than happy to release – quite frankly, this wouldn't have been possible without him!
So what did I end up with? A beautiful landscape for my fingers! Keycaps that transition better than anything out there was the goal, but I will let others be the judge on that!

Compared to KLP-Lamé, these look a lot "bulkier", this is just due to my personal preferences and has no influence on functionality. Although they look like KLP's big sibling – they are in fact a fraction lower! And by a fraction I really mean that, a fraction, braindefender didn't leave much room for improvement in that direction. They also offer more diversity in the available keycap shapes than any other keycaps I am aware of.
I designed these keycaps specifically with ergo keyboards in mind, so it really shines on column staggered (or ortho too?) keyboards with all its different shapes. It is probably not quite so interesting for the standard row staggered keyboard crowd…sorry people.
As I don't care about sound (the less the better for me) I am not going to touch on that.
The way home
As I return from this rabbit hole with CLP gracing my daily driver, I couldn't be happier. As a slider rather than a lifter, the CLP keycaps align with my typing style.
They are the perfect keycaps – completely objective and totally unbiased view of their creator!
From dissatisfaction with existing keycaps to the creation of CLP – this was a fascinating journey. Working together with braindefender added a collaborative layer, demonstrating that this community thrives on shared expertise and a passion for innovation.
CLP Keycaps, born out of personal preferences and meticulous design iterations, printing mishaps, fixing errors and overcoming doubts stand as a landscape for my fingers, a landscape where form meets function. Saying these keycaps revolutionize the typing experience would be pushing the envelope ever so slightly 😉
For me they stand as a testament to the endless possibilities in the world of keyboard customization.
| Victor Hobe-Gelting |
|---|---|
| Handle | vvhg/vvhg1 |
| Location | Germany |
| Occupation | AI Engineer |
| Joined | 2021 |
| Niche | split ergo |
| Fav. keycap profile | 😉 |
| Links | CLP, Fisk |
Published on Thu 14th Dec 2023. Featured in KBD #2023.
Related

3D printed caps
3D printed keycaps with lots of useful info in the comments.
The story of Signature Plastics
President Bob Guenser sums up the history of Signature Plastics, creator and manufacturer of keycap profiles like SA and DSA, on occasion of preparing for retirement and searching for buyer candidates.
Rasti64
Penk Chen's Rasti64 is a 64-key, low-profile board sporting the author's custom keycap set.
Filco "patch caps"?
A relatively new keycap profile/system I wasn't aware of. Spotted in a Filco teaser posted by ffbe_noctis.